Configurations in Spotlight
Configurations in the Spotlight app can be broadly categorized into the following sections:
Furthermore, to enable the customer creation, certain mandatory fields in the core system must be filled. For example, nationality, street name. Therefore, these fields are updated with default dummy values until the user enter the actual details. For more information about the default values in the core system and how to configure these values, refer to Default values in the Core System.
Business Configurations
As an administrator, you can define business configurations. These configurations reflect in the client app at run-time during the Onboarding process. You can modify the values in the Spotlight, and then refresh the Origination app to see the changes.
Under this section in the Spotlight app, you can configure and manage the Eligibility Criteria of the Origination app to perform the following:
- Add new criteria to add eligibility criteria.
- View the list of criteria already created.
- Edit, delete, or deactivate/activate eligibility criteria.
System Configurations
The system configurations enable you to configure various fields in the Infinity Origination app. These configurations can be made by altering values of various keys associated with their respective fields.
In the Spotlight app, there are several keys defined by default for various fields of the Infinity Origination app. However, you can also create new key to configure other fields of your choice. For more information about creating a new key, refer create a new key.
Configurations using Default Keys
The value set for each key in the Spotlight app reflects in the client app. In case, the client app fails to retrieve details from Spotlight, the default values are displayed.
NOTE: All these configuration keys are available in two app bundles in Infinity Spotlight: Retail Origination_Infinity and Retail_Origination_SFDC. In case of the standard Origination app flow (Self-service flow), the configurations are loaded from the Retail Origination_Infinity Bundle. For Salesforce integrated Origination app flow (SFDC), the configurations are loaded from the Retail Origination_SFDC bundle. Therefore, to configure any module, make sure to choose the required Origination app bundle based on the type of the app flow, I.e self-service flow or Salesforce integrated Origination flow.
Following is the list of the possible configurations and the associated keys and values. You can change the default values to configure the client app.
- Configure Country code
Key Value COUNTRY_CODE United States (Your_value) The default value for this key is United States. If you do not want to see any value in the field by default, set the value to NO_DEFAULT_VALUE. When the value is set to NO_DEFAULT_VALUE, the Country field is not pre-filled with the default value (United States) when the Address and Identification details page appears.
You can modify it to any of the following values:
 see values
- India
- Sri Lanka
- United Kingdom
- United Arab Emirates
- United States of America
- Singapore
- Indonesia
- Italy
- Iran
- Iraq
- Ireland
- Germany
- France
- Spain
- Netherlands
- Greece
- Portugal
- Malta
- Poland
- Sweden
- Austria
- Finland
- Croatia
- Belgium
- Cyprus
- Denmark
- Romania
- Hungary
- Switzerland
- NO_DEFAULT_VALUE
- Enable/disable Google Maps suggestion
Key Value GOOGLE_MAP ON/OFF (Your_value) The default value for this key is ON. If you do not want to see address suggestions, you can set the value to OFF.
- Configure Date Format
The default value for this key is MM/DD/YYYY.Key Value DATE_FORMAT MM/DD/YYYY or DD/MM/YYYY (Your_value)
- Idle timeout Configuration
The default value for this key is 5 minutes. You will be logged out of the Infinity Origination app if you are inactive on the app for 5 minutes continuously.Key Value IDLE_TIMEOUT 5 (Your_value) - Configure Home Address Sequence
If you set the value to GENERIC, the sequence of the Home Address will be: Country, State, City, Zip Code. If you set the value to USA, the sequence of the Home Address will be: City, State, Zip Code.Key Value HOME_ADDRESS_SEQUENCE GENERIC/USA (Your_value)
The default value for this key is GENERIC. - Configuration of Home Address
The default value for this key is SHOW and the country field is displayed in the Infinity Origination app.Key Value HOME_ADDRESS SHOW/HIDE (Your_value) - Configure Eligibility criteria
If you set the value to true, the Eligibility Criteria section appears in the Infinity Origination app. If you set the value to false, the Eligibility Criteria will be hidden.Key Value IS_CREDIT_UNION TRUE/FALSE (Your_value)
The default value for this key is TRUE. - Configure Currency Format
The default value for this key is comma.Key Value CURRENCY_FORMAT_THOUSANDS .(period) / ,(comma) (Your_value)
The default value for this key is period.Key Value CURRENCY_FORMAT_DECIMALS .(period) / ,(comma) (Your_value) - Currency Support Configuration
Key Value CURRENCY_CODE US Dollar (Your_value) The default value is US Dollar. However, you modify it to any of the following values:
see values
- US Dollar
- Euro
- Costa Rican Colon
- British Pound Sterling
- Israeli New Sheqel
- Indian Rupee
- Japanese Yen
- South Korean Won
- Nigerian Naira
- Philippine Peso
- Polish Zloty
- Paraguayan Guarani
- Thai Baht
- Ukrainian Hryvnia
- Vietnamese Dong
This configuration is supported from 2020.07 version onwards.
- Configure Currency Localization
The value of the default locale key determines the currency format. By default, the value is set to en-US.
Key Value DEFAULT_LOCALE en-US(Your_value)
For example, in case of German currency format, groups of 3 digits are separated by full stop. In case of Swiss currency, groups of 3 digits are separated by apostrophe.
You can modify it to any of the following values:- en-GB: The app displays the currency format of United Kingdom
- de-DE: The app displays the currency format of Germany
- en-IN: The app displays the currency format of India
- en-US: The app displays the currency format of United States
- fr: The app displays the currency format of France
This configuration is supported from 2020.07 version onwards.
- Configure Default Product
Key Value DefaultProduct { "id": "SAVINGS.ACCOUNT", "name": "Savings Account", "currency": "USD" }NOTE: The value can change depending on the product groups available in Marketing Catalogue microservice.
However, you can change the value to the following to other accounts such as:
{ "id": "PREFER.ACCOUNT", "name": "Current Account(Preferred)", "currency": "USD" } - Default Product Group ID
Key Value DEFAULT_PRODUCT_GROUPID CURRENT.ACCOUNTS, SAVINGS.ACCOUNTS (Your_value) The default value for this key is CURRENT.ACCOUNTS, SAVINGS.ACCOUNTS.
NOTE: The value can change depending on the product groups available in the Marketing Catalogue microservice. Furthermore, you can configure upto 2 product groups, with a minimum of 1 product group.
- Enable/disable Pre-Fill Details module
The default value for this key is true. This enables you to upload scanned documents. You can modify the value to false if you want to hide the Pre-Fill Details section.Key Value SCAN_UPLOAD_DOC true, false(Your_value) - Configure Reference Data Objects
The ReferenceDataObjects key holds the title of the objects whose master data has to be downloaded. The default value for this key is LegalIdentifierType. The LegalIdentifiertype comprises of Passport, Driver License, ID State, Foreign Government ID, and Military ID.Key Value ReferenceDataObjects LegalIdentifierType (Your_value)
If the master data for more than one value is required, you can add the value by adding a comma. Apart from the legalIdentifierType, you can add country and countrysubdivision. - Configure OTP Resend Limitation
By default, the number of times you can click Resend is limited to 5.Key Value OTP_ResendLimit 5 (Your_value) - Configure OTP Module
The default value for this key is true and the OTP verification section appears in the Infinity Origination app.Key Value OTPModulePresent true, false (Your_value) - Configure OFAC Content
The OFAC value is the content displayed in the app under Important information for procedures for opening a new account. section at the bottom of the Personal Information section. Based on the requirement, you can modify the value of the OFAC key.Key Value OFAC To help the government fight the funding of terrorism and money laundering activites, Federal law requires all financial institutions to obtain, verify and record information that identifies each person who opens an account. In the same instances, we may use outside sources to confirm the information provided by you. The information you provide is protected by our privacy policy and Federal Law. What this means for you: by clicking continue, you authorize us to collect your name, address, date of birth, ID and other information that will allow us to identify you. (Your_value) - Data Validation Configuration
Each field in the Personal Information section, Identity Section, and Address Info section are associated with certain rules to validate the data that you enter in the app. You can choose to configure and remove any of the fields such as the FirstName to remove the validation for the selected field.Key Value DATA_VALIDATION_NUO { "PersonalInfo": { "FirstName": "FIRSTNAME", "LastName": "LASTNAME", "Age": "MINOR_AGE", "Email": "EMAIL", "MobileNumber": "MOBILE_NUMBER" }, "IdentityInfo": { "IdNum": "ID_ALPHANUMERIC", "IssuedCountry": "NAME", "IssuedState": "NAME" }, "AddressInfo": { "Country": "NAME", "State": "NAME", "Zipcode": "ZIPCODE" } },
For more information on the concept of data validation by using business rules, commonly used rule sets, and custom rules, refer to Data Validation. - Configure Default Funding Amount
The default value for this key is 5 dollars.Key Value FUNDING_AMOUNT 5 (Your_Funding_Amount) - Payment methods configuration
The default value for this key is "Existent": ["INTER","INTRA","MANUAL"]. In this case, the app displays all the three methods in the Payment Type screen. Otherwise, if the value is set to "Prospect":["INTER","MANUAL"], the app displays only two payment methods. The INTRA payment method is not displayed because a prospect does not have an internal account to perform an Intra-bank tranfer. For more information on the Payment methods, refer to Funding.Key Value PAYMENT_METHOD {"Existent": ["INTER","INTRA","MANUAL"],"Prospect":["INTER","MANUAL"]}(Your_value)
This configuration is supported from the 2020.07 version onwards. - Plaid link
The value of this key is the third party integration link. Currently, this value cannot be modified.Key Value PLAID_ID https://cdn.plaid.com/link/v2/stable/link-initialize.js - Enable/Disable Funding Module
Key Value FUNDING_MODULE SELFSERVICE, BOTH, NONE The default value of the key is SELFSERVICE for standard Origination app. For the Salesforce Integrated Origination application, the default value of the key is NONE. The Funding section can be enabled or disabled based on the value, as follows:
- SELFSERVICE: The Funding option is enabled only when user creates a new application or resumes an application from the Infinity Origination app. The option is disabled when a customer service representative creates a new application or resumes an application the Infinity Spotlight app.
- BOTH: The Funding option is enabled when user creates a new application or resumes an application from the Infinity Origination app, and also when a customer service representative creates a new application from the Infinity Spotlight app.
- NONE: The Funding option is disabled when user creates a new application or resumes an application from the Infinity Origination app. Furthermore, the Funding option is also disabled when a customer service representative creates a new application from the Infinity Spotlight app.
- Product Types for funding
Key Value FUNDING_PRODUCT_GROUPID ["Savings", "Checking", "Deposit"] The value of this key determines the product types to be shown in the Funding section. You can configure the value of this key as per the requirements.
- Recipient bank name
Key Value RECIPIENT_BANK Infinity bank This key specifies the recipient bank's name that is displayed in the app. Using this configuration, you can modify the recipient bank's name.
- Authentication configuration
Key Value AUTHENTICATION_TYPE MFA This key specifies the authentication method used to verify the phone number of the applicant. MFA is the default authentication method used to verify the applicant's phone number with a secure access code.
- Enable/Disable CoApplicant
Key Value CoApplicant_Mandatory True, False The default value of this key is False. If the value of the key is set to True, the CoApplicant section is displayed in the Personal Information section, where the user must choose about a CoApplicant. Alternatively, if the value is set to False, the CoApplicant section is not displayed in the Personal Information section and the user can continue without choosing about the CoApplicant.
- Open an account prior to product selection
Key Value OPEN_ACCOUNT_BUTTON ON/OFF The default value of the key is OFF. If the value of this key is set to ON, users will be provided with an option to open a new account in the Product Dashboard pages, without having to select a product in the dashboard. If the value is set to OFF, the option to open a new account is disabled before selecting the product and does not appear in the dashboard pages.
- Start Application from Retail Banking app
Key Value DBP_ONBOARDING_URL <BaseURL>/apps/Origination/#frmlanding NOTE: Value varies based on the environment.
To create a new account for users, users can be navigated from the Retail Banking application to the Infinity Origination app by configuring the deeplink URL against this key. For a Salesforce integrated Origination app, the value can be configured to <BaseURL>/apps/Onboarding/#_frmStartup?BranchRef=GB0010001&BankRef=SFDC
- Save & Leave Option for CSR Mode
Key Value SAVEANDLEAVE_OPTION Hide, Show
The default value of the key is Show. For the Salesforce Integrated Origination application, the default value of the key is Hide. Therefore, If the value of the key is set to Hide, then the Save & Leave option is not displayed throughout the Origination journey. Otherwise, if the value of the key is set to Show, the Save & Leave option is displayed in the app.
- Analytics Instance ID
Key Value ANALYTICS_TMINSTANCEID ed9fd472-e583-4b4f-9a3d-7ec7d17f2777
This is a UUID identifying the Journey Analytics instance and is added in the claims token of the JWT token used to invoke analytics services. You can configure the value of the Instance ID using this key.
- Prospect password expiry date
Key Value PROSPECT_EXPIRY_DATE 30
The default value of this key is 30. It determines the number of days after which password generated for prospect expires. You can modify the password expiry duration by configuring this key.
- Landing Dashboard banner image
Key Value LANDINGDASHBOARD_BANNER initiallanding_image.png
The default value is the name of the image present in the assets folder of the Origination client app. You can modify the banner image by configuring the value of this key.
- Landing Dashboard banner description
Key Value LANDINGDASHBOARD_BANNER_DESCRIPTION save smarter, faster than ever with infinity
The above-mentioned value if the default value of the key. You can modify the Landing dashboard banner description by configuring this key.
- Landing Dashboard banner image for Desktops
Key Value LANDINGDASHBOARD_BANNER_LARGE initiallanding_image_large.png
The default value is the name of the image present in the assets folder of the Origination client app. You can modify the banner image for desktop devices by configuring the value of this key.
- Fetch products based on Purpose
Key Value PURPOSE Onboarding
The value of the Purpose key is used to fetch the specific products from the Marketing Catalog Microservice. The default value of the key, Onboarding, will fetch the products associated with the Origination app.
- Branch Reference
Key Value BRANCH_REF GB0010001
This configuration is used to get Branch reference which is internally used as the request parameter for Marketing Catalog microservice services.
-
Enable/Disable Country code in Personal Information section
Key Value COUNTRY_CODE_STATE Show, Hide This configuration enables you to show the country code field in the Personal Information section, if the value is set to Show. Otherwise, the field is hidden when the value is set to Hide.
- Origination App Deeplink URL in Product Selection section
Key Value APP_URL <BaseURL>/apps/Origination In the Product Group dashboard screen, each product card contains a Learn More button that is deeplinked to the specific Product Details page. Using this configuration, you can configure the Base URL of the deeplink URL.
- Setting the upper limit in the Deposit Amount Range
Key Value CD_DEPOSITAMOUNT_MORE REST Using this configuration, you can configure the upper limit of the last deposit amount range in Terms Deposit section of the Product Selection screen. When the value is set to REST, the upper limit of the deposit amount is more. For example, 10000 + more.
- Upload Document device support
Key Value SCAN_UPLOAD_DOC { "desktop": "false", "mobile": "true", "tablet": "true" } By default, the document upload is maintained breakpoint wise as ID Scan and Selfie Verification only for mobile and tablet devices. However, using this configuration, you can configure the device support for the ID scan and Selfie verification sections.
- Enable/Disable Selfie Verification section
Key Value IS_SELFIE_MANDATORY True, False This key is set to True by default , therefore, after scanning an identity document, the user is navigated to the Selfie Verification section. However, you can skip the Selfie Verification section by configuring the value to False.
- User location popup
Key Value USER_LOCATION_POPUP SHOW, HIDE This configuration allows you to show or hide the location popup in the Identity section. If the value is set to Show, then the current geolocation of the device is accessed. Otherwise, if the value is set to Hide, the popup is not displayed and the geolocation is not accessed.
- RedHat PAM configuration
Key Value ENTITY_ITEM_PAM_CONFIG [ { "eventType": "APPLICATION_SUBMITTED", "entityItemDefinitionName": "MetaData", "fieldName": "", "operand": "", "fieldValue": "", "processDetails": { "processType": "create", "processId": "RetailOnboarding.ApplicationSubmission", "signalName": "" } }, { "eventType": "FUNDING_REQUEST_RAISED", "entityItemDefinitionName": "Funding", "fieldName": "", "operand": "", "fieldValue": "", "processDetails": { "processType": "create", "processId": "RetailOnboarding.FundingRequest", "signalName": "" } }, { "eventType": "USER_ACTION_SUBMITTED", "entityItemDefinitionName": "AccountUsage", "fieldName": "", "operand": "", "fieldValue": "", "processDetails": { "processType": "resume", "processId": "RetailOnboarding.CreateAccounts", "signalName": "accountUsageSignal", "uniqueSignalRequired": false } }, { "eventType": "USER_ACTION_SUBMITTED", "entityItemDefinitionName": "Citizenship", "fieldName": "", "operand": "", "fieldValue": "", "processDetails": { "processType": "resume", "processId": "RetailOnboarding.CreateUserAction", "signalName": "Citizenship", "uniqueSignalRequired": true } }, { "eventType": "USER_ACTION_SUBMITTED", "entityItemDefinitionName": "MobilePhoneNumberConsent", "fieldName": "", "operand": "", "fieldValue": "", "processDetails": { "processType": "resume", "processId": "RetailOnboarding.CreateUserAction", "signalName": "MobilePhoneNumberConsent", "uniqueSignalRequired": true } }, { "eventType": "USER_ACTION_SUBMITTED", "entityItemDefinitionName": "BackupWithholding", "fieldName": "", "operand": "", "fieldValue": "", "processDetails": { "processType": "resume", "processId": "RetailOnboarding.CreateUserAction", "signalName": "BackupWithholding", "uniqueSignalRequired": true } }, { "eventType": "USER_ACTION_SUBMITTED", "entityItemDefinitionName": "EmploymentStatus", "fieldName": "", "operand": "", "fieldValue": "", "processDetails": { "processType": "resume", "processId": "RetailOnboarding.CreateUserAction", "signalName": "EmploymentStatus", "uniqueSignalRequired": true } }, { "eventType": "USER_ACTION_SUBMITTED", "entityItemDefinitionName": "MonthlyGrossIncome", "fieldName": "", "operand": "", "fieldValue": "", "processDetails": { "processType": "resume", "processId": "RetailOnboarding.CreateUserAction", "signalName": "MonthlyGrossIncome", "uniqueSignalRequired": true } }, { "eventType": "USER_ACTION_SUBMITTED", "entityItemDefinitionName": "StartDate", "fieldName": "", "operand": "", "fieldValue": "", "processDetails": { "processType": "resume", "processId": "RetailOnboarding.CreateUserAction", "signalName": "StartDate", "uniqueSignalRequired": true } }, { "eventType": "USER_ACTION_SUBMITTED", "entityItemDefinitionName": "IncomeDocument", "fieldName": "", "operand": "", "fieldValue": "", "processDetails": { "processType": "resume", "processId": "RetailOnboarding.CreateUserAction", "signalName": "IncomeDocument", "uniqueSignalRequired": true } }, { "eventType": "USER_ACTION_SUBMITTED", "entityItemDefinitionName": "ConfirmAddress", "fieldName": "", "operand": "", "fieldValue": "", "processDetails": { "processType": "resume", "processId": "RetailOnboarding.CreateUserAction", "signalName": "ConfirmAddress", "uniqueSignalRequired": true } }, { "eventType": "USER_ACTION_SUBMITTED", "entityItemDefinitionName": "SecondaryCitizenshipCountry", "fieldName": "", "operand": "", "fieldValue": "", "processDetails": { "processType": "resume", "processId": "RetailOnboarding.CreateUserAction", "signalName": "SecondaryCitizenshipCountry", "uniqueSignalRequired": true } }, { "eventType": "USER_ACTION_SUBMITTED", "entityItemDefinitionName": "Age", "fieldName": "", "operand": "", "fieldValue": "", "processDetails": { "processType": "resume", "processId": "RetailOnboarding.CreateUserAction", "signalName": "Age", "uniqueSignalRequired": true } } ]This is the configuration using which the fabric integration service (OnBoardingJavaServices/FilterEventsForPAMOperation) will create or resume a PAM process. You can configure the process type for any event type as per the requirements.
- Backup Withholding user action
Key Value USER_ACTION_BACKUPWITHHOLDING_CONFIG { "UserActionName":"BackupWithholding", "Group":"Legal", "Skippable":"false", "Title":"Backup withholding", "UserActionType":"Radio-ButtonSelection", "Options":[ "No, I'm not subject to backup withholding", "Yes, I have heard that I'm subject to backup withholding" ], "OptionsType":"PREDEFINED", "Description":"Have you been notified by the local government that you are subject to backup withholding?", "DynamicDataDefinition":"", "NeedsReview":"true" }The descriptions of the parameters in the value are as follows:
- UserActionName: Name of the User Action.
- Group: Categorizes the user actions based on the subject.
- Skippable: Specifies whether a user action is mandatory or can be skipped.
- Title: Specifies the heading of the userAction card displayed in the client app.
- UserActionType: Specifies the type of the user action such as Radiobutton selection, document upload, etc.
- OptionsType: There can be two option types - PREDEFINED or GLOBAL_CONFIG. If the Options Type is set as PREDEFINED the options will be provided as an array. If the Options Type is set as GLOBAL_CONFIG, the options will be picked up from the global config available, the name of which will be provided in the options key.
- Options: Specifies either an array of predefined options or the name of the global config.
- Description: Content of the User Action card. This field could be dynamic as per the data provided by the user.
- DynamicDataDefinition: Holds an array of name to which the dynamic values need to be overwritten and the corresponding json path in the ODMS useraction entitiy Item.
- ObjectName: The name of the entity item from which data has to be fetched in case of dynamic tiles/description.
- NeedsReview: Specifies if the userAction needs to be reviewed by the bank user or not.
Backup withholding is a tax levied on investment income, at an established tax rate, as an investor withdraws it. The default value of the USER_ACTION_BACKUPWITHHOLDING_CONFIG key is mentioned in the table. The value can be modified as per the requirements.
- Age user action
Key Value USER_ACTION_AGE_CONFIG { "UserActionName":"Age", "Group":"Additional Info", "Skippable":"false", "Title":"Age", "UserActionType":"Numeric", "Options":"", "OptionsType":"", "Description":"Please provide your age", "DynamicDataDefinition":"", "NeedsReview":"true" }For description about the parameters in the above-mentioned value, click here. This user action requests the age of the user. The USER_ACTION_AGE_CONFIG configuration can be modified as per the requirements.
- Citizenship user action
Key Value USER_ACTION_CITIZENSHIP_CONFIG { "UserActionName":"Citizenship", "Group":"Additional Info", "Skippable":"false", "Title":"Citizenship", "UserActionType":"Radio-ButtonSelection", "Options":[ "I'm a citizen of this country", "I'm a citizen of another country" ], "OptionsType":"PREDEFINED", "Description":"Under federal regulations, we need to gather your citizenship information", "DynamicDataDefinition":"", "NeedsReview":"true" }For description about the parameters in the above-mentioned value, click here. This user action checks the citizenship of the user. The USER_ACTION_CITIZENSHIP_CONFIG configuration can be modified as per the requirements.
- Confirm Address user action
Key Value USER_ACTION_CONFIRMADDRESS_CONFIG { "UserActionName":"ConfirmAddress", "Group":"Additional Info", "Skippable":"false", "Title":"Confirm your address at %Address1 %city %state", "UserActionType":"Radio-ButtonSelection", "Options":[ "Own", "Rent", "Live for free" ], "OptionsType":"PREDEFINED", "Description":"Do you own, rent or live for free at %Address1 %city %state", "DynamicDataDefinition":{ "AddressInfo":[ { "name":"Address1", "path":"$.AddressLine1" }, { "name":"city", "path":"$.City" }, { "name":"state", "path":"$.State" } ] }, "NeedsReview":"true" }For description about the parameters in the above-mentioned value, click here. This user action checks the address details of the user. The USER_ACTION_CONFIRMADDRESS_CONFIG configuration can be modified as per the requirements.
- Employment status user action
Key Value USER_ACTION_EMPLOYMENTSTATUS_CONFIG { "UserActionName":"EmploymentStatus", "Group":"Income", "Skippable":"false", "Title":"Employment status", "UserActionType":"Radio-ButtonSelection", "Options":[ "Employed", "Self-Employed", "Other" ], "OptionsType":"PREDEFINED", "Description":"Select your current employment status.", "DynamicDataDefinition":"", "NeedsReview":"true" }For description about the parameters in the above-mentioned value, click here. This user action checks the employment status of the user. The USER_ACTION_EMPLOYMENTSTATUS_CONFIG configuration can be modified as per the requirements.
- Income document user action
Key Value USER_ACTION_INCOMEDOCUMENT_CONFIG { "UserActionName":"IncomeDocument", "Group":"Income", "Skippable":"true", "Title":"Income document", "UserActionType":"DocumentUpload", "Options":"", "OptionsType":"", "Description":"Upload a document showing your income - such as a payslip or tax statement. This will help us process your application faster.", "DynamicDataDefinition":"", "NeedsReview":"true" }For description about the parameters in the above-mentioned value, click here. This user action requests an upload of an income document such as pay slip or tax statement. The USER_ACTION_INCOMEDOCUMENT_CONFIG configuration can be modified as per the requirements.
- Mobile Phone number consent user action
Key Value USER_ACTION_MOBILEPHONENUMBERCONSENT_CONFIG { "UserActionName":"MobilePhoneNumberConsent", "Group":"Legal", "Skippable":"false", "Title":"Mobile phone number consent", "UserActionType":"Radio-ButtonSelection", "Options":[ "The bank can call or text me through automated means", "The bank can only contact me through non-automated means", "The bank can't contact me (this may impact your approval)" ], "OptionsType":"PREDEFINED", "Description":"If the phone number provided on this application is a mobile phone number, it is my mobile phone number, and by clicking on the button below, I consent to receive auto-dialed and prerecorded/artificial calls, including texts, relating to my relationship with this bank. It may include handling, servicing, and billing for any of my account(s). Message and data rates may apply. You can stop these messages by contacting our service center.", "DynamicDataDefinition":"", "NeedsReview":"true" }For description about the parameters in the above-mentioned value, click here. This user action takes the approval from the user on the modes of contact with the bank. The USER_ACTION_MOBILEPHONENUMBERCONSENT_CONFIG configuration can be modified as per the requirements.
- Monthly Gross Income user action
Key Value USER_ACTION_MONTHLYGROSSINCOME_CONFIG { "UserActionName":"MonthlyGrossIncome", "Group":"Income", "Skippable":"false", "Title":"Monthly income", "UserActionType":"Currency", "Options":"", "OptionsType":"", "Description":"Provide your estimated monthly income, including all sources of income.", "DynamicDataDefinition":"", "NeedsReview":"true" }For description about the parameters in the above-mentioned value, click here. This user action requests the estimated monthly income of the user. The USER_ACTION_MONTHLYGROSSINCOME_CONFIG configuration can be modified as per the requirements.
- Secondary citizenship user action
Key Value USER_ACTION_SECONDARYCITIZENSHIPCOUNTRY_CONFIG { "UserActionName":"SecondaryCitizenshipCountry", "Group":"Additional Info", "Skippable":"true", "Title":"Secondary citizenship country (if applicable)", "UserActionType":"Single-SelectionDropdownList", "Options":"ISO_COUNTRY_LIST", "OptionsType":"GLOBAL_CONFIG", "Description":"If you have a second citizenship in another country, select it from the list", "DynamicDataDefinition":"", "NeedsReview":"true" }For description about the parameters in the above-mentioned value, click here. This user action verifies if the user has a second citizenship in another country. If so, the country name is a taken as input. The USER_ACTION_SECONDARYCITIZENSHIPCOUNTRY_CONFIG configuration can be modified as per the requirements.
- Start date user action
Key Value USER_ACTION_STARTDATE_CONFIG { "UserActionName":"StartDate", "Group":"Income", "Skippable":"true", "Title":"Start Date", "UserActionType":"Date", "OptionsType":"", "Options":"", "Description":"When did you start working for this employer? (enter month, date and year in the format mm/dd/yyyy)", "DynamicDataDefinition":"", "NeedsReview":"true" }For description about the parameters in the above-mentioned value, click here. This user action requests the date on which the user started working for the specific employer. The USER_ACTION_STARTDATE_CONFIG configuration can be modified as per the requirements.
- Spotlight Deeplink URL from Workspace
Key Value AC_SPOTLIGHT_URL <BaseURL>/apps/Spotlight/#_frmDashboard This configuration enables you configure the deeplink URL using which the user can be redirected from Workspace to Spotlight.
- Data Display Direction in Workspace
Key Value DIRECTION LTR, RTL This configuration specifies the direction to display the data in the application. The default value of this configuration is LTR (Left to Right). You can configure the value as LTR or RTL, as required.
- Default Application View in Workspace
Key Value DEFAULT_APPLICATION_VIEW Submitted, Not Submitted, Completed The Application Management section in the Workspace contains three tabs: Not Submitted, Submitted, and Completed. The default value of this key is Submitted. You configure the default application view to any of the three tabs, as required.
- Default Workspace Module
Key Value DEFAULT_MODULE Application Management, Task Management The Application Management module contains two sections: Application Management and Task Management. The default view of the Workspace when launched is Application Management. You can configure the default view to any of the two sections, as required.
Create a New Key
Apart from the existing keys, you can also create a new key to configure a field or a section of the client app.
The process of creating a new key includes running a script in the database and making some changes in your Visualizer project.
To make the required changes in the database, follow these steps:
- Open the required database.
- Generate a script with the following format in your database.
INSERT INTO dbxdb.configurations (configuration_id, bundle_id, config_type, config_key, description, config_value, target, isPreLoginConfiguration)
With values, the script must look like this:
INSERT INTO dbxdb.configurations ('NUO_CONFIG_BUNDLE','NUO_CONFIG_BUNDLE','PREFERENCE','YOUR_KEY','YOUR_DESCRIPTION', 'YOUR_VALUE','CLIENT/SERVER','1'); - Run the script. After running the script, open the Spotlight app.
Navigate to Configuration > System Configuration > APP ID: NUO. You will see the newly created key.
NOTE: Using the isPreLoginConfiguration boolean flag, you can determine if a configuration can be accessed prior to the login.
You have successfully added a new key to the System Configurations in the Spotlight app.
After adding the key to the Spotlight app, you must ensure that the client app retrieves the values of these keys from Spotlight successfully. To do so, follow these steps:
- In Visualizer, open your Infinity Origination project.
- From the Project Explorer, navigate to Reference Architecture Extensions > ConfigurationManager > BusinessControllers > BusinessController.
- Write the following code.
this.systemConfiguration = { "YOUR_KEY" : "YOUR_VALUE" }; - From the Project Explorer, navigate to Controllers and then to the required form Controller.
- Write the following code.
var configManager = applicationManager.getConfigurationManager().getSystemConfig("Your key")
The value of the new key that you created now reflects in the client app. In case the client app fails to retrieve the details set in the Spotlight app, it displays the default value defined in the System Configurations.
Terms and Conditions
All the disclosures and the terms and conditions can be configured from the Application Content Management > Terms & Conditions module.
Configuring Terms and Conditions
Here are the steps to configure a disclosure or terms and conditions from Spotlight:
- Open the Spotlight app.
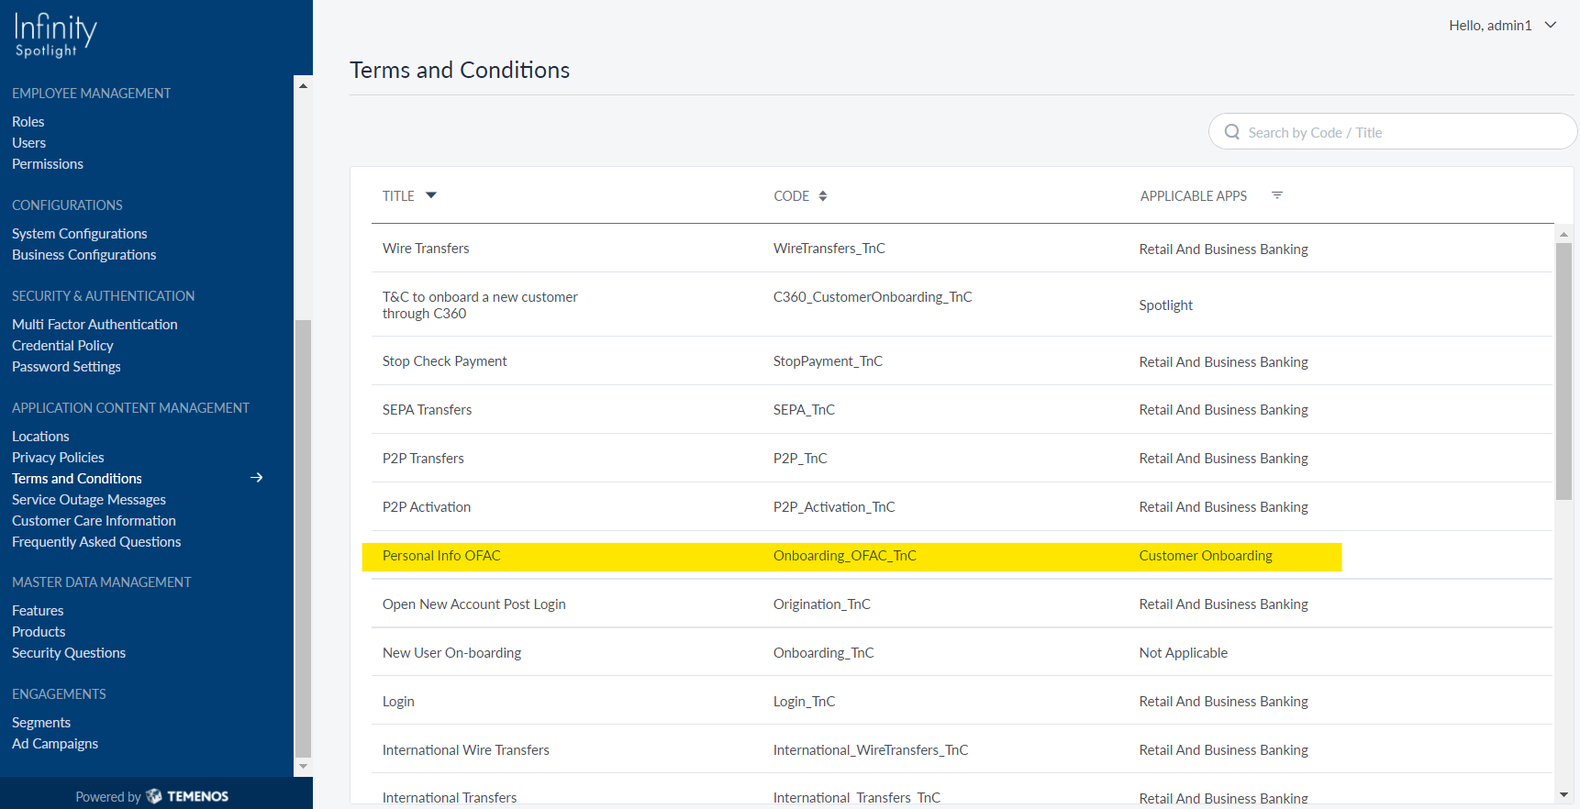
- Navigate to Application Content Management > Terms and Conditions.

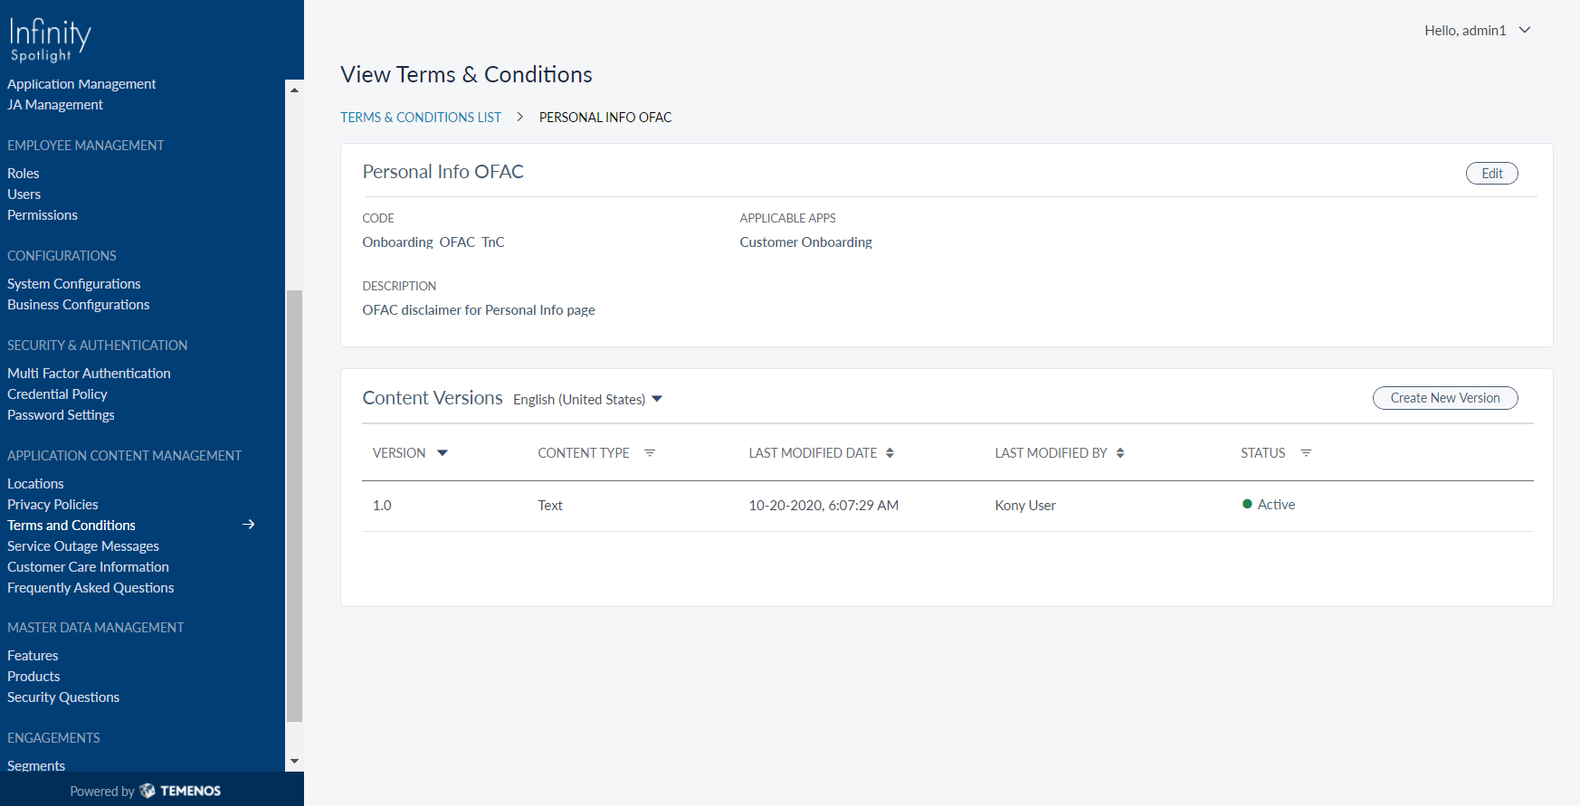
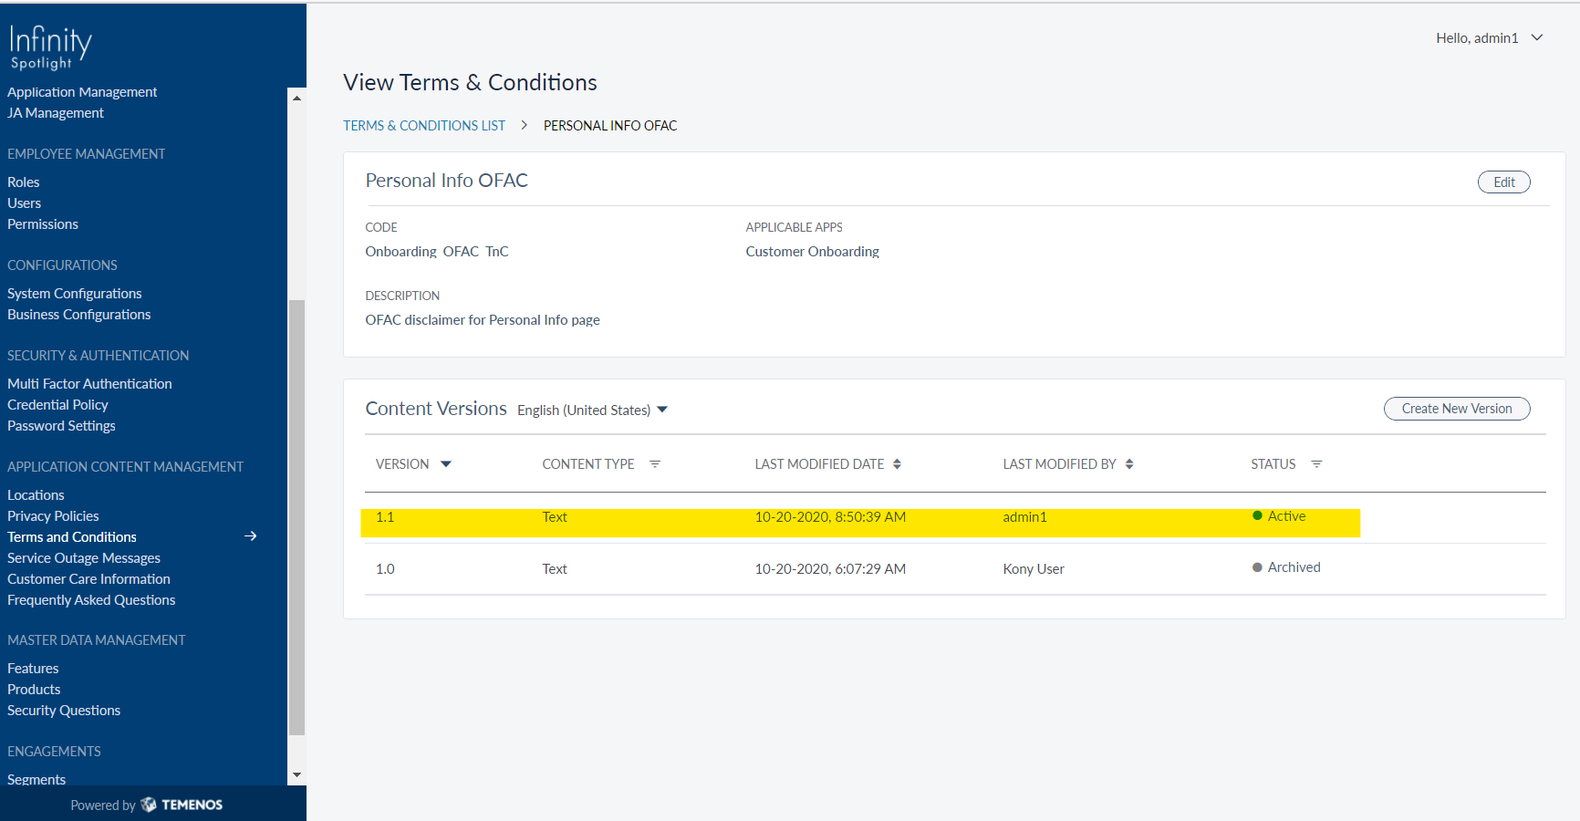
- From the list of titles, select the row that you want to modify. The details of the selected title are displayed.

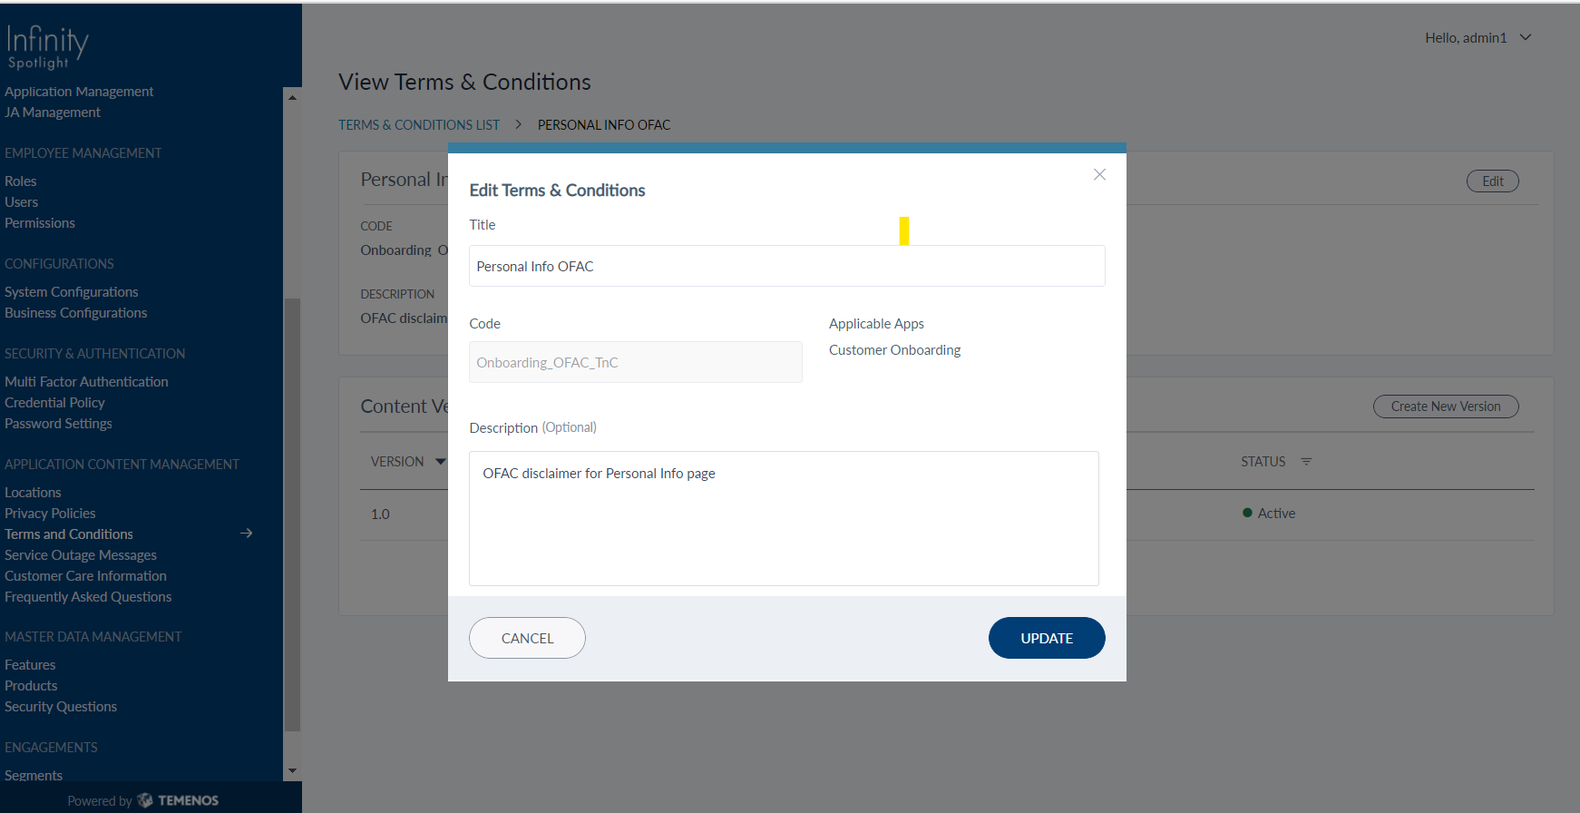
- If you want to modify the title and description, click Edit. Modify the name and click Save.

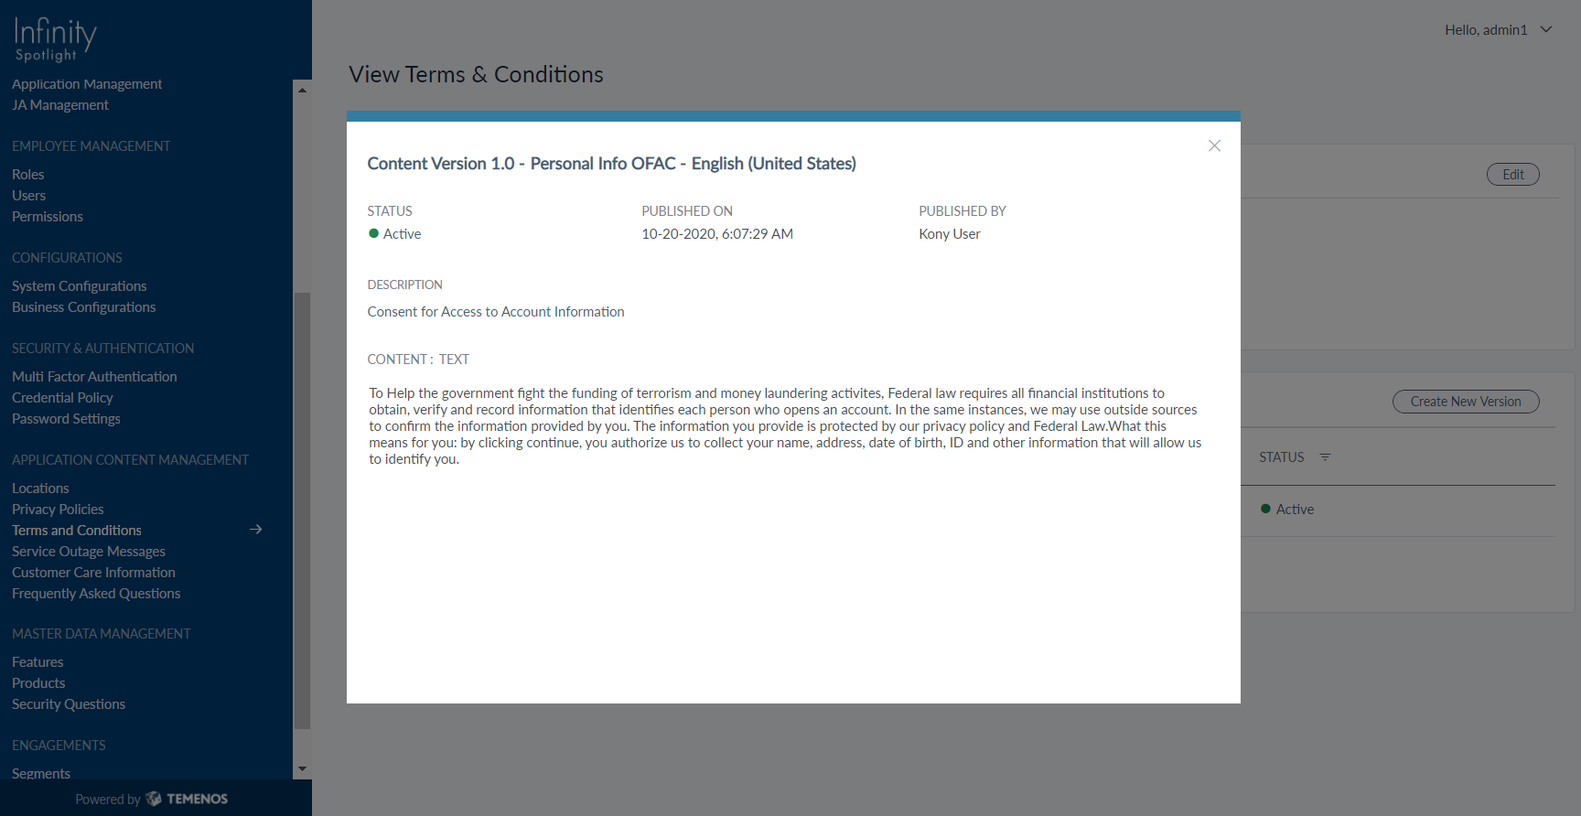
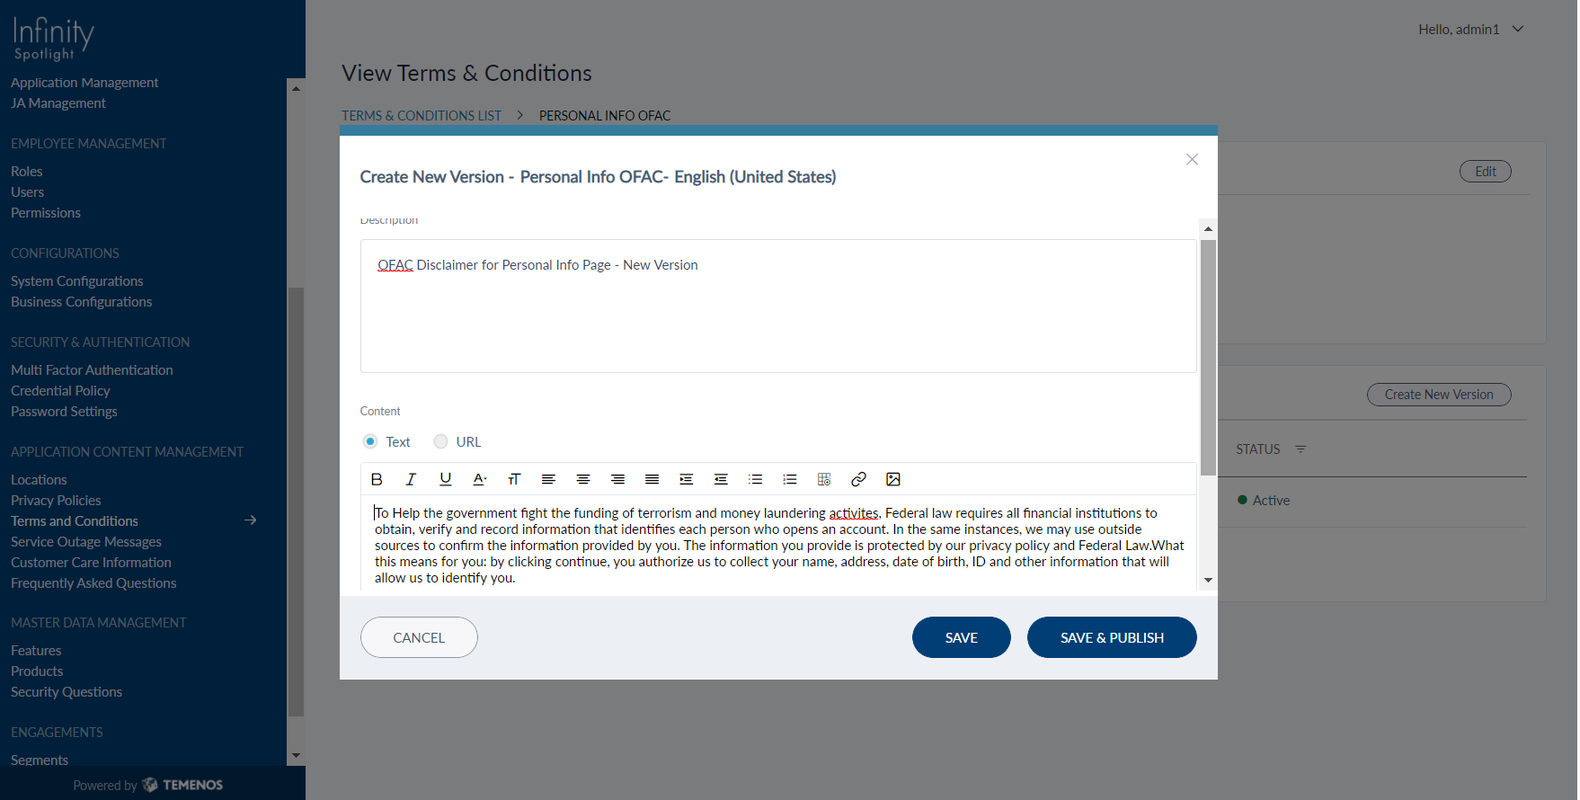
- If you want to modify the content, go to the Content Versions section and click Create New Version. Modify the description, content type, or content.

- Click Save and Publish.

- The new version that you just created becomes active.

List of Configurations
Here is the list of configurations that are available in the Terms and Conditions module:
- OFAC Content
Title Code Value Personal Info OFAC Onboarding_OFAC_TnC To Help the government fight the funding of terrorism and money laundering activites, Federal law requires all financial institutions to obtain, verify and record information that identifies each person who opens an account. In the same instances, we may use outside sources to confirm the information provided by you. The information you provide is protected by our privacy policy and Federal Law.What this means for you: by clicking continue, you authorize us to collect your name, address, date of birth, ID and other information that will allow us to identify you. - e-Sign Agreement
Title Code Value Existing Member e-Sign Agreement Onboarding_eSign_Agreement https://apply.usbank.com/api/documents/disclosures/ESIGN_Consent_Agreement_Auth.pdf - Google Maps disclosure
Title Code Value Address & ID Google Maps disclosure Onboarding_GoogleMaps_Disclosure By providing your address in this application, you agree to and are bound by Google's Terms of Service and the Google Privacy Policy. Additionally, you are bound by our privacy policy and any and all data retention requirements imposed by law. - Payment Type/ OTP disclaimer
Title Code Value Funding - Payment Type/ OTP disclaimer Onboarding_FundingDisclaimer1 You can choose to fund your account either using same bank account or an account from a different bank. You will have to provide authenticated account information once your account is created in our record, thus we will use to fund your account. - Existing Accounts/Manual Accounts disclaimer
Title Code Value Funding - Existing Accounts/Manual Accounts disclaimer Onboarding_FundingDisclaimer2 Not all accounts are eligible for funds transfer.
- Funds transfer completed through Infinity online banking before the cut-off time on a business day will be posted to your eligible account the same day.
- Credit card, line of credit loan and mortgage transactions may take up to 3 business days to process, but will be posted on the business date when the transaction was made.
- Acknowledgement disclaimer
Title Code Value Funding - Acknowledgement disclaimer Onboarding_FundingDisclaimer3 Auto approval of the application does not guarantee the creation of account. When account gets created, we will send an acknowledgement mail to you. - ID Scan disclaimer
Title Code Value ID Scan disclaimer Onboarding_IDScan_Disclaimer The scan your ID document retrieves information used only on the context of this application. The bank stores the scanned document as a proof of identity and in accordance to local regulations. - Product Dashboard disclaimer
Title Code Value Product Dashboard disclaimer Onboarding_ProductDashboard_Disclaimer Investing involves risks, and there is always the potential of losing money when you invest in securities. You should review any planned financial transactions that may have tax or legal implications with your personal tax or legal advisor.
Create a new Configuration
To create a new entry in the list of configurations under the Terms and Conditions module, the following three tables must be updated:
- termandcondition: This table stores ids and codes for list of configs to be displayed in Spotlight T&C module.
- termandconditiontext: This table stores the content, content type, and version id of each config stored in the termandcondition table.
- termandconditionapp: This table stores mapping of config id to app id.
Here is the procedure to create a new entry in the Terms and Conditions module:
- Open the required database.
- Generate a script to update the three tables in database. The script to update the Personal Info OFAC T&C database, for example:
INSERT INTO `dbxdb`.`termandcondition` (`id`, `Code`, `Title`, `Description`) VALUES ('1920026', 'Onboarding_OFAC_TnC', 'Personal Info OFAC', 'OFAC disclaimer for Personal Info page'); INSERT INTO `dbxdb`.`termandconditiontext` (`id`, `TermAndConditionId`, `LanguageCode`, `Version_Id`, `Description`, `ContentType_id`, `ContentModifiedBy`, `Status_id`) VALUES ('3450026', '1920026', 'en-US', '1.0', 'Consent for Access to Account Information', 'TEXT', 'Kony User', 'SID_TANDC_ACTIVE'); INSERT INTO `dbxdb`.`termandconditionapp` (`id`, `TermAndConditionId`, `AppId`, `createdby`) VALUES ('2312353', '1920026', 'ONBOARDING', 'Kony user'); - Run the script. After running the script, open the Spotlight app.
Navigate to Application Content Management > Terms and Conditions. The newly created key is displayed.
Default values in the Core System
To enable the customer creation, it is mandatory to fill in certain fields in the core system. Thus, these fields are updated with default values. The default values updated in the core system are listed below.
| Transact (Customer Table) |
Default Value | Fabric Parameter |
|---|---|---|
| LANGUAGE | 1 (English) | language |
| CUSTOMER.STATUS | 4 (Retail client Standard) | customerStatus |
| TARGET | 4 (Retail client Standard) | target |
| ACCOUNT.OFFICER | 26 (Retail Banking) | accountOfficerId |
| INDUSTRY | 1000 (Private Person) | industryId |
| SECTOR | 1000 (Individuals) | sectorId |
| STREET | Street | street |
| POST.CODE | postCode | 500021 |
| GENDER | gender | MALE |
| NATIONALITY | US | nationalityId |
| RESIDENCE | US | residenceId |
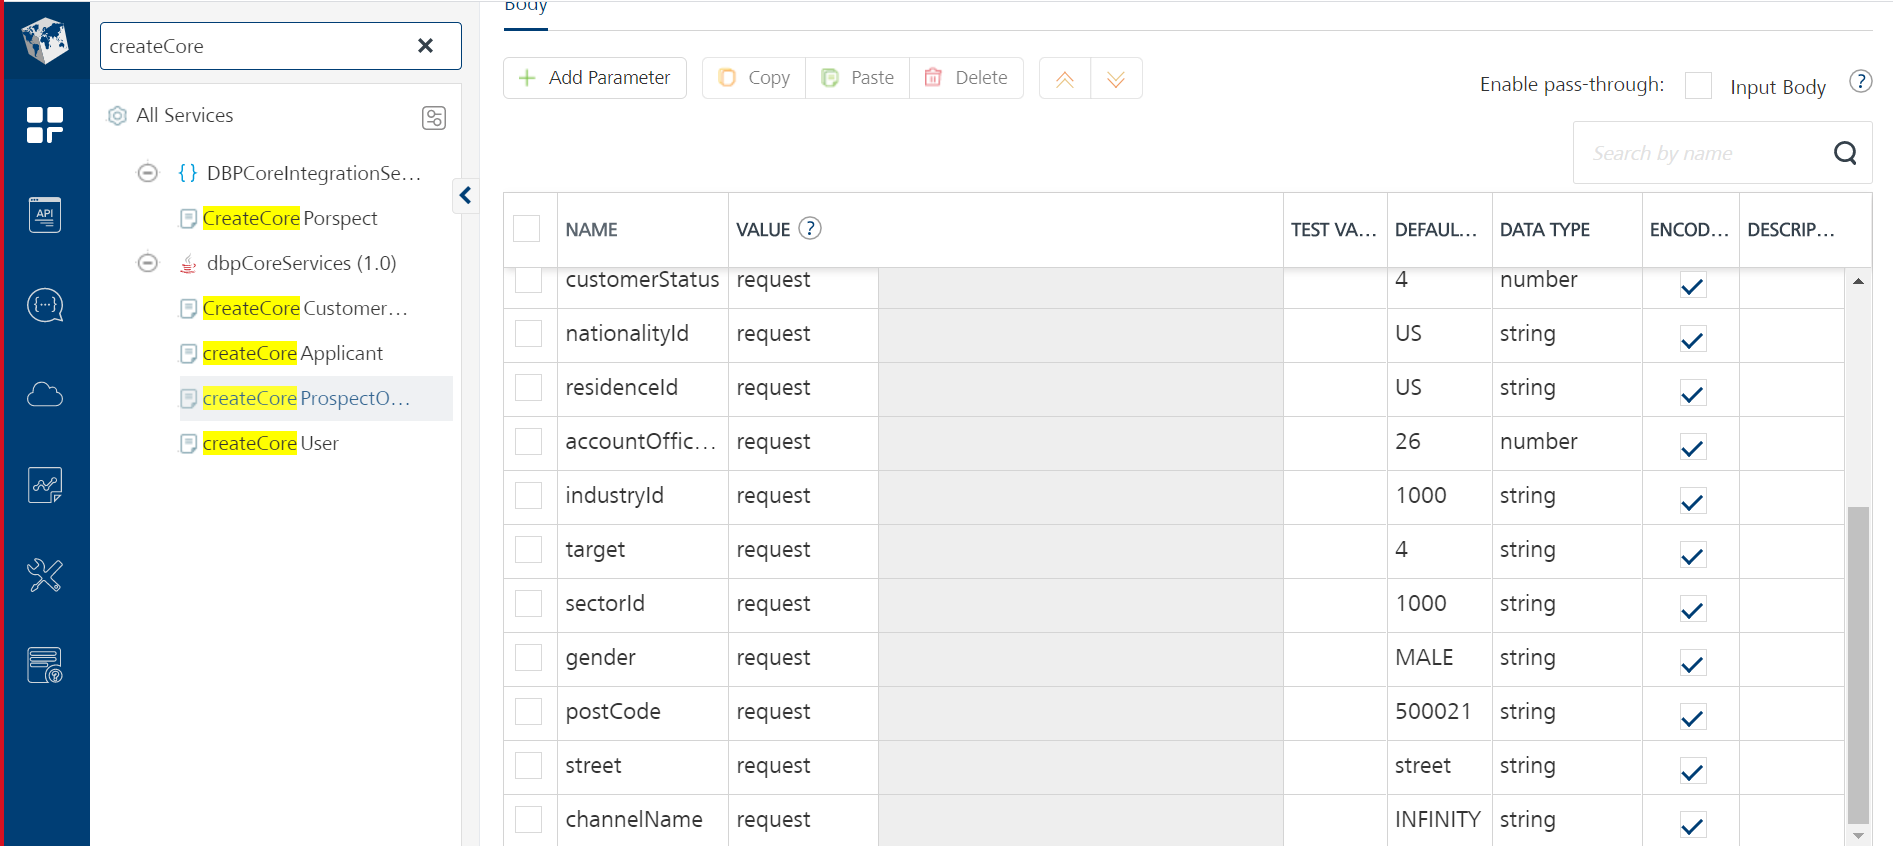
If you want to modify the default values in the core system, you can do so by configuring these values from Quantum Fabric. Follow these steps to modify the default values:
- Login to Quantum Fabric.
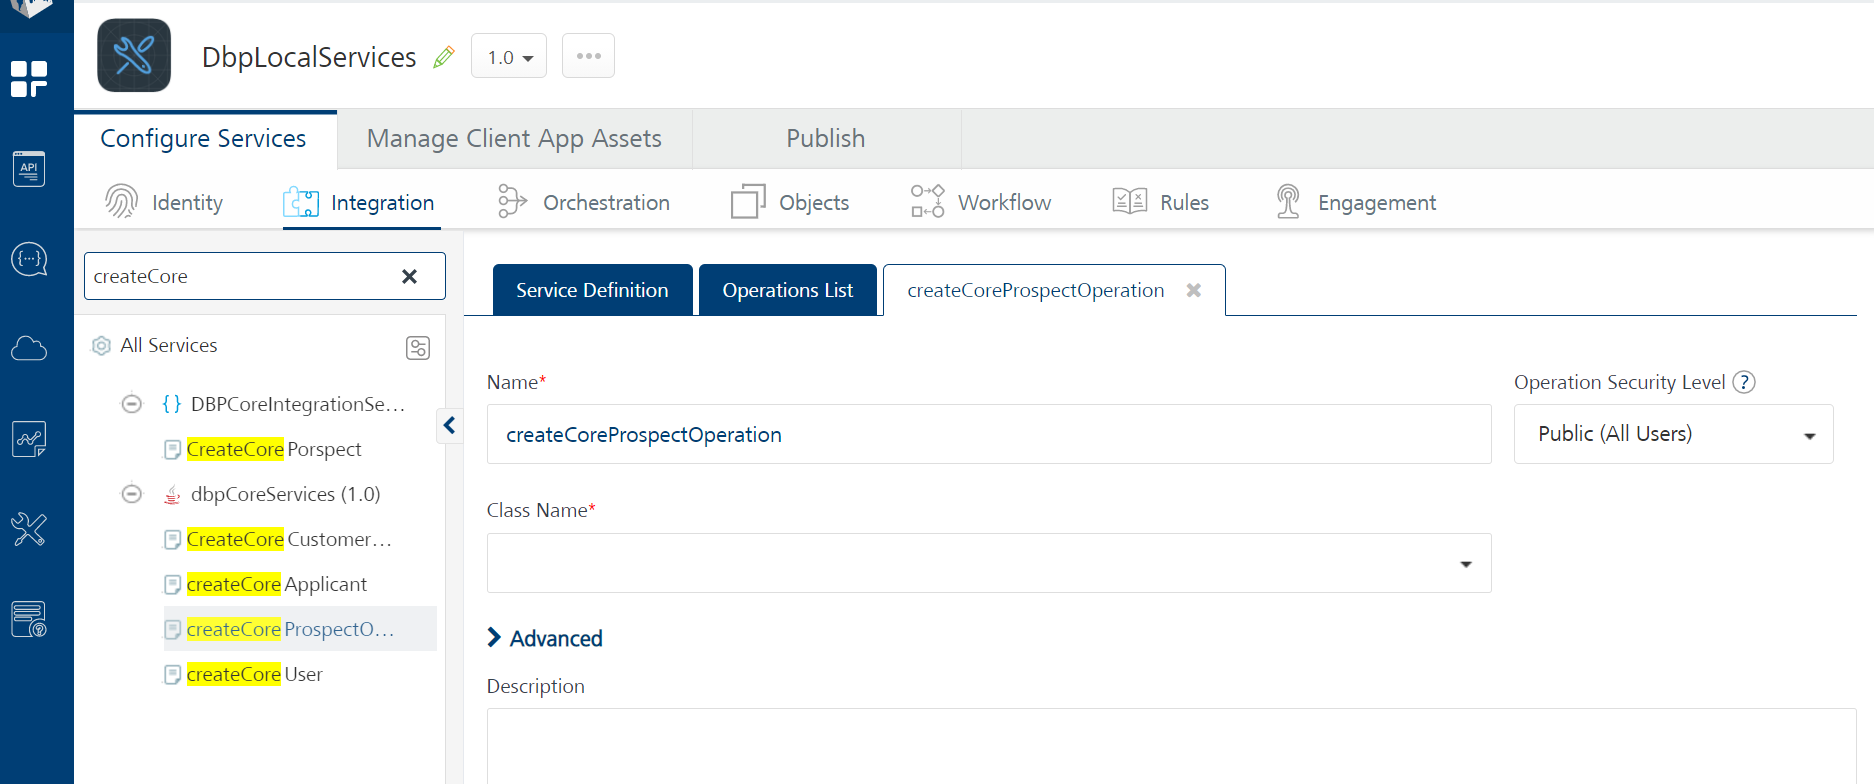
- From the list of apps, select DbpLocalServices.
- In the ConfigureServices section, navigate to the Integration tab.
- In the Search bar, type createCoreProspectOperation and select the service that appears.
- Navigate to Request Input > Body.
- From the list of parameters, navigate to parameter that you want to modify and enter the desired value.

- Click Save.
- Navigate to the Publish tab and publish the app.
The default value of the parameter is now updated.
In this topic
