Approval Matrix
The approval matrix defines the rules for approvals including the number of approvals required and the designated approver, based on the value of the transaction. Use the feature to define the approval limits (per transaction, daily and weekly) for each account associated with the company.
An authorized user need not manually set up approvers at each account and feature level one at a time. Instead the authorized user can add a set of simple readable rules to define the approvals. For instance, a rule could say that "All Bill payment above $1000 require an approval for any one of User X, User Y or User Z". These rules would then translate into the approval matrix for the company. Alternatively, Business Owners can also view the advanced view of all the approval rules at account and feature level and modify them at a finer level.
Straight through processing (STP): For every transaction initiated, whenever the approval matrix is referred to and there are no approval rules available, this is considered as an error scenario and the transaction is not submitted. However, it is possible that businesses would like to have a range of values for which transactions must not be directly processed. In this case, it must be considered that an approval is not required and process the transaction directly. The application has the provision to disallow Rule Check for a specific range of values. For this range of values, no approvals are required on transactions and such transactions are subject to Straight through processing (STP).
 More information on approval matrix
- At the time of company creation, an approval matrix is created automatically and associated with the company.
- The matrix does not specify any approver which implies that all transactions will either be automatically approved (if it is within the user’s pre-approval permission) or denied (if it is above the user’s auto denied limit). If a transaction needs approval and the approver information is not found in the approval matrix, the transactions will be stopped from execution. One approval matrix is associated with a company.
- The approval matrix is built around the approval limits associated with the company and for every feature that the company has given access.
- By default, no approval rules are set for any feature or any account.
- When accounts are unlinked from a company, the approval matrix is revised and the information for the unlinked account is removed.
- When a new account is linked to the company, the approval matrix is revised and the information for the linked account is added for every feature that the company has been given access with the default values. By default, no approval rules are set for any feature or any account.
- Each company can define its own approval matrix.
- The FI can view the approval matrix of a company through Spotlight application. However, the bank has view-only access to every company’s approval matrix and cannot change the approval matrix through the Spotlight application.
- Turn Approval Matrix on and off at Customer ID level. An authorized user who has access to edit the Approval Matrix for a certain Customer ID can turn off the approvals entirely for a customer from the online banking application. If the Approval Matrix is disabled for an individual customer within the contract, there are no rules for transactions made on accounts under that Customer ID. This would mean straight-through processing of transfers on accounts associated with this Customer ID without having to query the Approvals Engine. Any monetary or non-monetary feature action transaction that is being made by various users who have access to the Customer ID will undergo straight-through processing and will not be subject to the Approvals Engine. See Configuration for more information.
- Approval Matrix per customer with groups or without groups. An authorized user with the access to edit the approval matrix for a certain Customer ID can specify whether the approval rules for the customer ID to be based on Users or Signatory Groups. See Configuration for more information.
- If the type is User based, the Approval Matrix for the customer ID will have the rules based on the existing implementation where rules can be specified with approver names.
- If the type is Signatory Group based, the Approval Matrix for the customer ID will have the rules based on the new approval group based rules.
- Rules for each feature action at a customer ID level: A user with the adequate permissions to Create / Edit Approval Policies can add one or more rules at the Customer ID level for each feature action. A user can specify the following information for a new rule:
- Range of values for which the rule is applicable.
- Define a Condition
- No Approvals Required
- Simple condition. A simple condition will have a single condition statement. The number of signatories can be as specified by the user. It must be one or more. A signatory group can be selected from amongst the groups associated with the customer ID for which the policy is being created.
- Compound condition. Multiple simple conditions working with an AND operator. There is no limit on the number of simple conditions that can be joined. A signatory group once added to one simple condition cannot be reused.
- Complex condition. Multiple simple or compound conditions working with OR operators between them. There is no limit on the number of simple/compound conditions that can be joined together.
- Straight-through processing (STP): An authorized user who has access to the approval matrix can set up monetary ranges/limits for which approval Rule Check can be disallowed for all monetary feature actions for the specified range of values. The user can set up the No Approval limits which is defined by using the Range, Upto, or Above options that are available in the application. For this range of values, no approvals are required on transactions and such transactions are subject to Straight through processing (STP). With straight through processing, the transaction is not put in the approvals queue and is directly submitted for execution. Note that if the No Approvals range is only met for per transaction but fails on the daily or weekly limit, then such transactions are subject to appropriate approvals queue for processing and are not processed in a straight-through manner.
- Straight-through Processing - Alerts for transfers, check book request, and approval flows
- If the initiator is also the approver of the same transaction, the authorization on transaction is implicitly counted. In such cases, the initiator will not receive an Approver type alert. This applies to Euro payment flows as well. The following are the two scenarios for straight-through processing:
- There are other approvals required on that particular transaction: In such cases, all the other approvers receive the notification of the request and the initiator who is also an approver, receives only the Initiator type alert.
- There are no other approvals required on that particular transaction: In such cases, the transaction is directly submitted and neither the approver or the initiator (who are the same) receives any Approver type alerts. An alert that the request has been submitted only is triggered.
- If the initiator is also the approver of the same transaction, the authorization on transaction is implicitly counted. In such cases, the initiator will not receive an Approver type alert. This applies to Euro payment flows as well. The following are the two scenarios for straight-through processing:
- Approval Alert Notification for transaction - transfer, bill payment, wire transfer, ACH collection/payment request, or an ACH file
- The initiator is notified whenever a transaction is submitted for approval through a Global type of alert. Bank agents can configure the Alerts from Spotlight for this specific event.
- The initiator receives a Global type of alert whenever an approval is received on a transaction that the initiator has initiated and submitted for approvals. The use case is providing an alert notification to the initiator when a user approves a transaction, but transaction is not submitted for execution. Bank agents can configure the Alerts from Spotlight for this specific event.
- The initiator receives a Global type of alert whenever a transaction that the initiator has initiated has received the requisite number of approvals and it is submitted for execution. All the approvers receive an alert notification indicating that the transaction that was in their bucket for approval has now been authorized and is submitted for execution. Bank agents can configure the Alerts from Spotlight for this specific event.
- The initiator receives a Global type of alert whenever a transaction that the initiator has initiated has been rejected by any one of the approvers. Bank agents can configure the Alerts from Spotlight for this specific event.
- A Global type of alert notification is sent to all the approvers of a specific transaction when the transaction has been rejected by any one of the approvers. The approver who has rejected a transaction, receives an alert indicated that the specific transaction has been rejected.
- Chequebook request flow
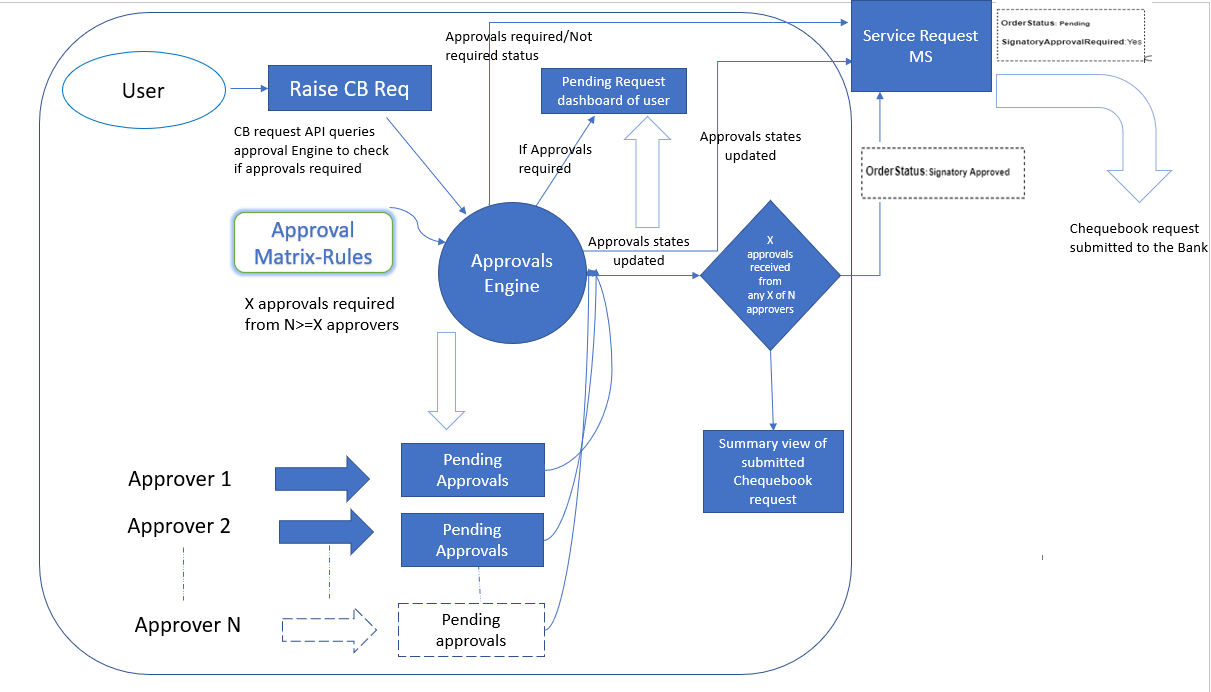
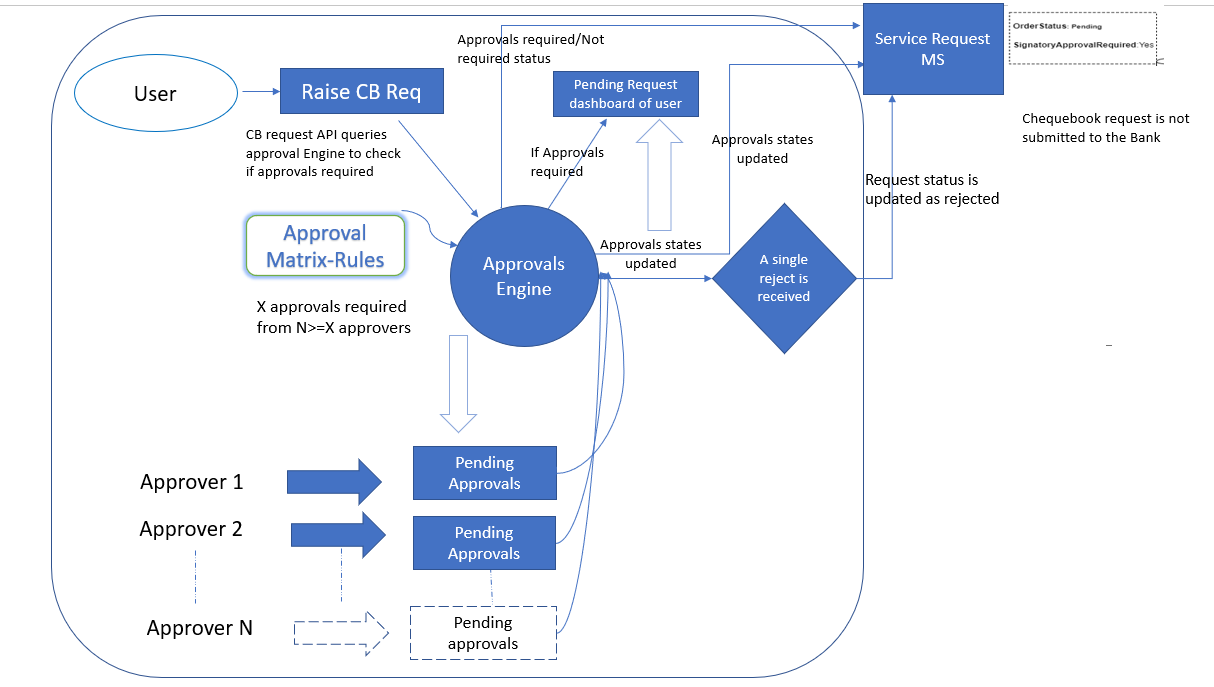
- In the banking application, an authorized user with requisite permissions can raise chequebook requests for own accounts. Currently, the bank can decide at the design-time to turn on an approval process for cheque book requests. When a customer submits a request for a new chequebook, the request is queried in the Approvals Engine to check if approval is required. If approvals are required as defined through “Create Cheque Book Requests” rules in the approval matrix, then after the request is submitted, the user is shown a message that the create chequebook request has now been submitted for approval. The request is processed and after the approval of required approvers, the cheque book request is submitted to the bank.
- Approvals Engine Handling: The application queries the approvals engine to deduce all the number of approvals required to authorize the request and send an approval request to all authorized approvals as set up in the approval matrix. The straight-through processing scenarios are also taken care where the initiator is also the approver on a particular transaction.
- Action to support approvals on chequebook requests: The surfacing of the cheque request feature on the application is controlled by mandates. Approvals are added to the Create Cheque Book Request Feature action to provide the privileges of approving Create Cheque Book Requests to identified individuals.
- See the flow diagram at the Configuration section showing the chequebook request process where multiple approvers are involved and scenarios covering the approval and rejection processes.
Menu Path:
- Side menu > Settings > Approval Matrix
- Top menu > Profile picture > Approval Matrix
The application displays the Approval Matrix dashboard on the Settings screen.
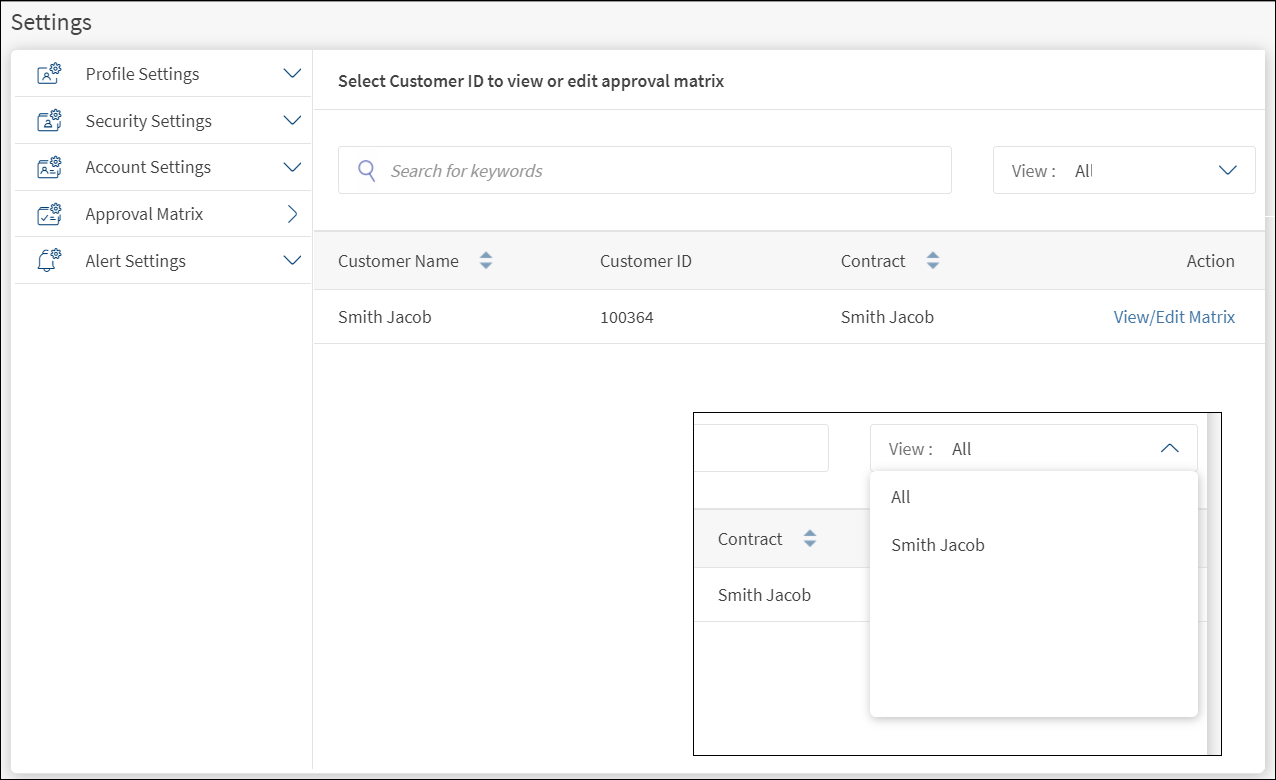
The Approval Matrix tab displays the following on the right pane:
- List of contracts: List of contracts (customer ID) with Customer Name, Customer ID, and Contract Name details. The newly added accounts show under the respective customer ID to which it is added.
- View or edit matrix: Click the View/Edit Matrix link to view or edit the selected approval matrix.
- Search: Use the search option to look for specific contracts by using the keywords such as the customer name, customer ID, or the contract name.
- View filter: Use the View list to filter the list by customer IDs or view all contracts. By default, the All option is applied.
View or Edit Approval Matrix
The form is the same for viewing and editing the approval matrix.
On the Approval Matrix dashboard, click the View/Edit Matrix link to view or edit the selected approval matrix.
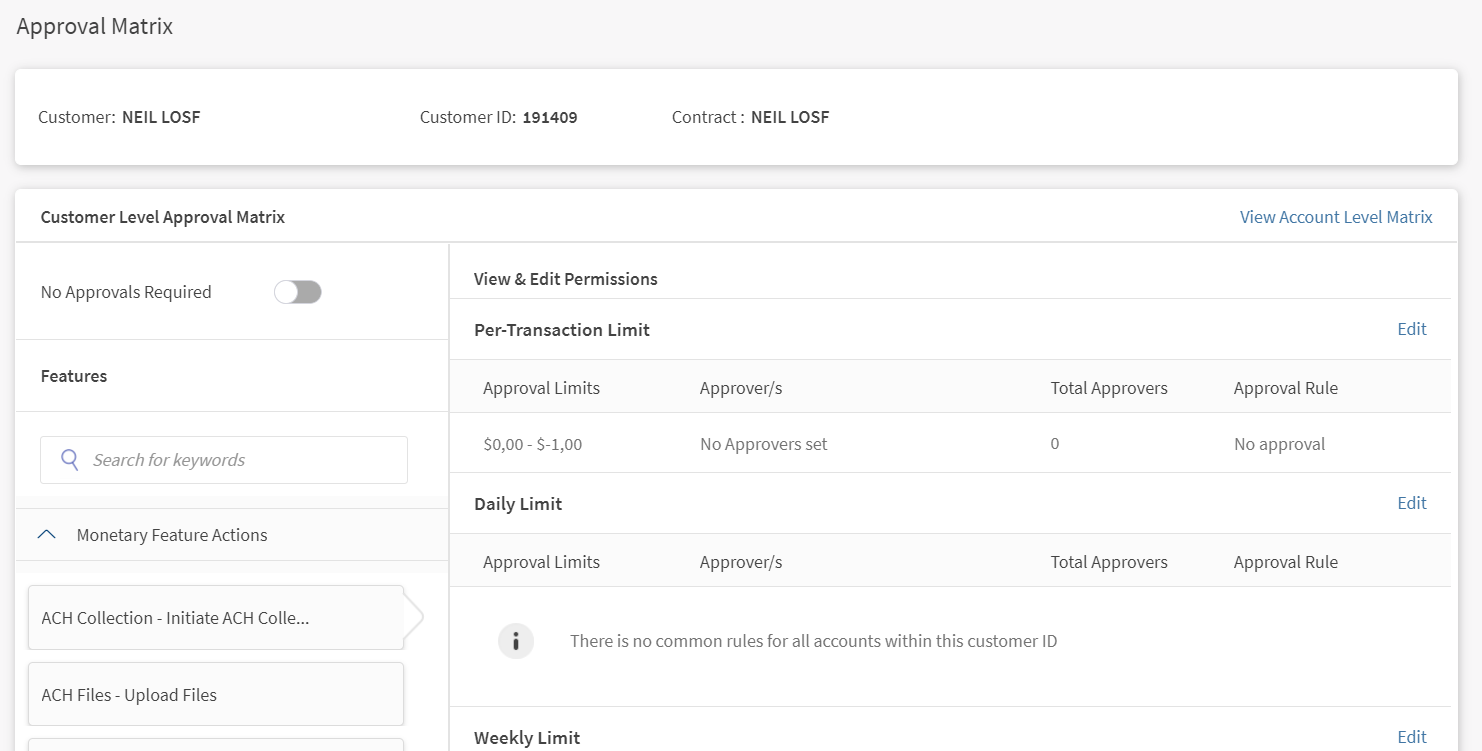
The application displays the following:
- Header: The Customer name, Customer ID, and the Contract name on top of the form.
- Customer Level Approval Matrix details
- Features list: Monetary and non-monetary feature actions on the left pane. Click any feature to view the corresponding permissions (per transaction, daily, and weekly limits) on the right pane. See Feature and action names for the complete list of features and actions.
- Search: Option to search for specific features on the left pane.
- View and Edit Permissions: For the selected feature, the corresponding permissions (per transaction, daily, and weekly limits) on the right pane with the following details: Approval Limits, Approvers, Total Approvers, and Approval Rule. Where there are no details, an appropriate message that no common rules are defined for the contract is displayed. Click the Edit link placed by the side of the permission to modify the details.
- No Approvals Required: By default, approval rules are not set up for the newly added account and hence the rule "No Approvals Required" is enabled/set by default. As a result, if any customer level rules have previously been setup, an abstraction of those rules is not displayed at the customer ID level as the new account does not have any rules set upfront. Therefore, at the customer ID level, the application displays an appropriate message to refer to the individual account-level rules. Provision to set up the no approval limits which is defined by using the Range, Upto, or Above options that are available in the application. For this range of values, no approvals are required on transactions and such transactions are subject to straight-through processing (STP). Use the toggle button to disable and set up the approval limits as required.

- View Account Level Matrix: Click to view or edit the matrix of accounts within the contract.
- Back button: Click Back to navigate back to the Approval Matrix dashboard.
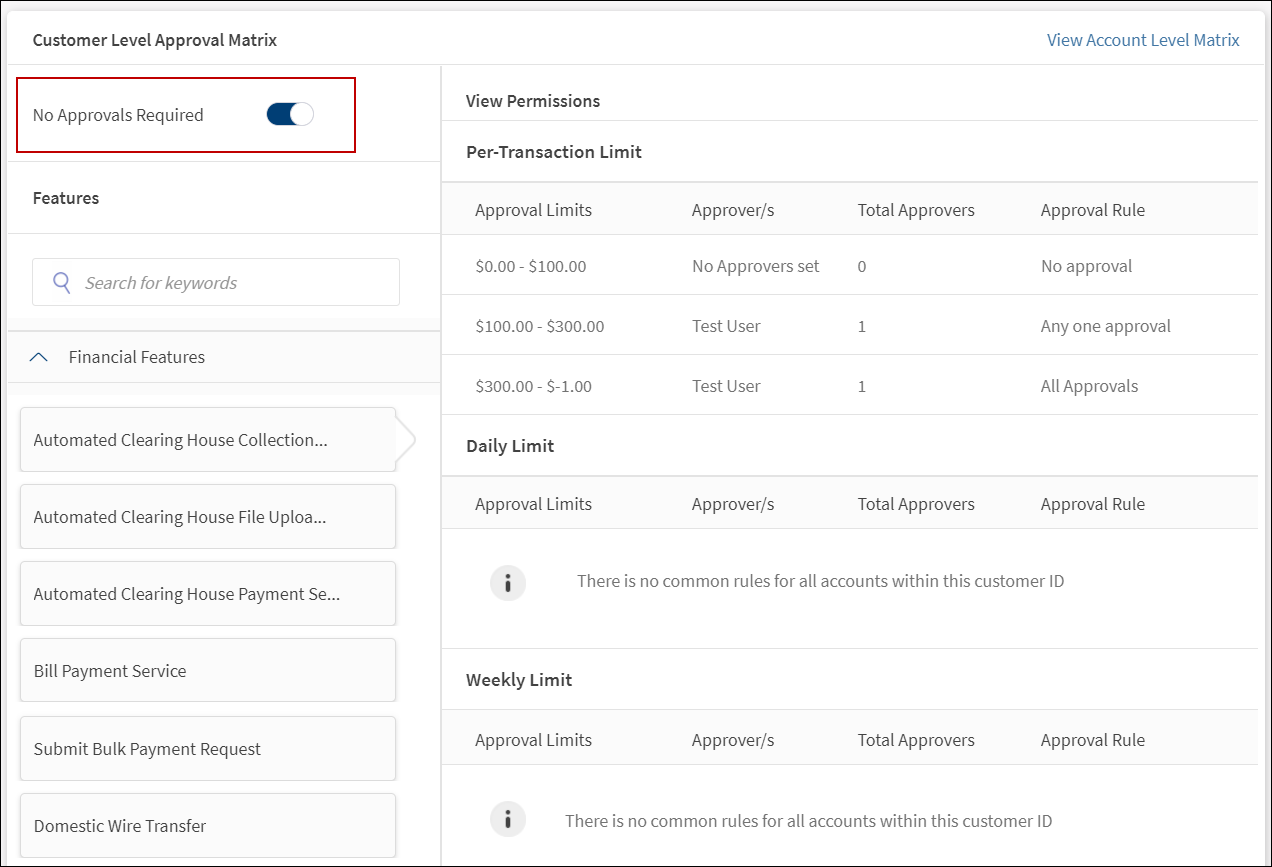
Edit Customer Level Approval Matrix
The application displays the list of applicable features on the left pane and the corresponding permissions (per transaction, daily, and weekly limits) on the right pane for each feature that involves monetary transactions.
- Per-transaction amount (Per-Transaction Limit)
- Cumulative daily transaction value (Daily Limit)
- Cumulative weekly transaction value (Weekly Limit)
The following details are displayed: Approval Limits for range of transaction values, Approvers for each range, Total number of Approvers, and Approval Rule. Where there are no details, an appropriate message that no common rules are defined for the contract is displayed.
To edit the customer level approval matrix for a selected feature, follow these steps:
- Select the feature (monetary and non-monetary feature actions) on the left pane. See Feature and action names for the complete list of features and actions.

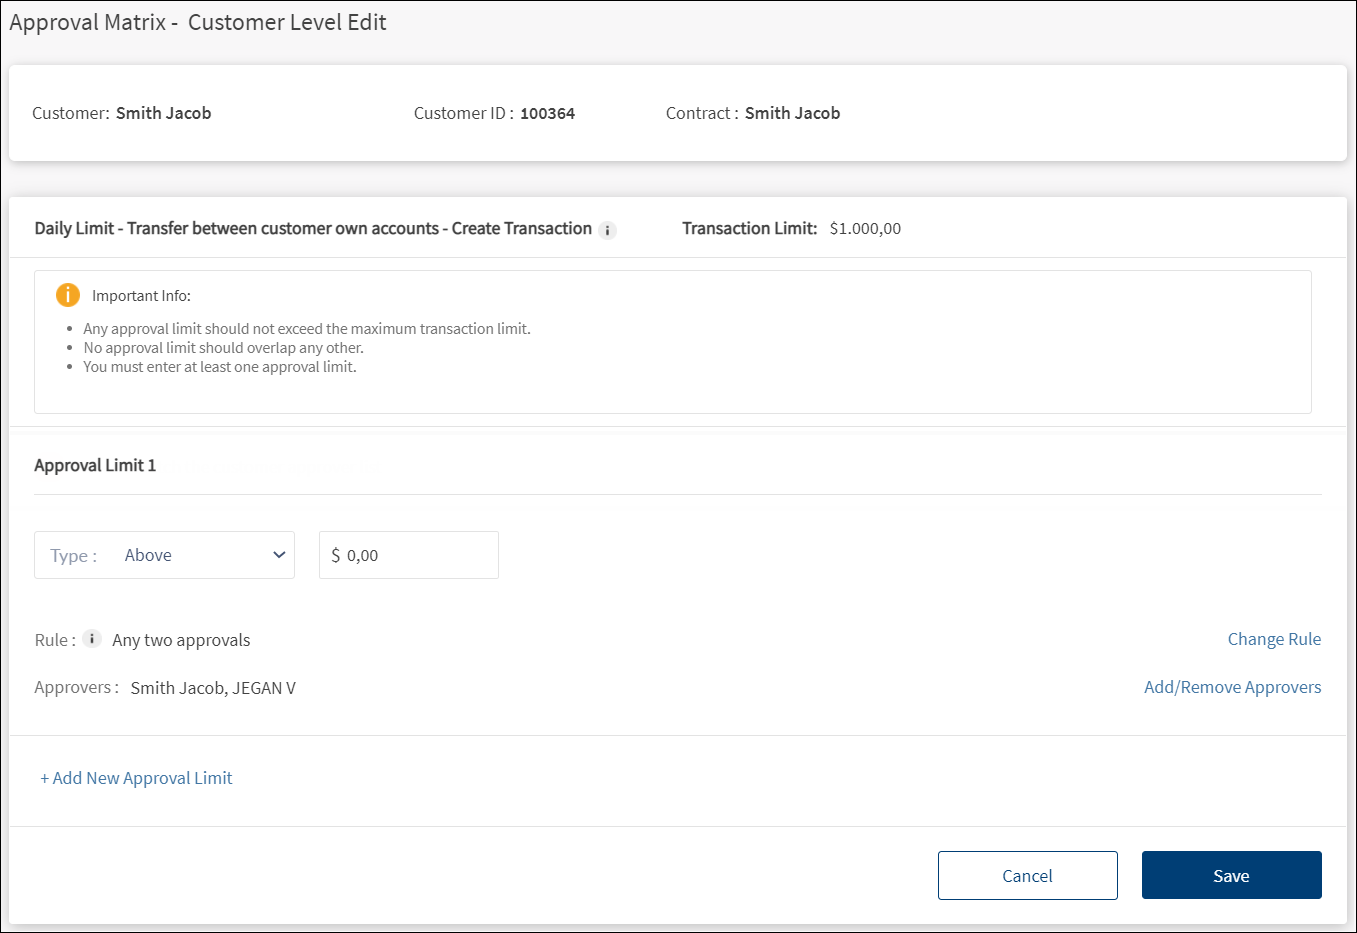
- On the right pane, click the Edit link placed by the side of the permission to modify the details. The Approval Matrix - Customer Level Edit screen is displayed.

- The application displays the Customer name, Customer ID, and the Contract name on the header and the feature name with the Transaction Limit on top of the form.NOTE:
- It is possible to have as many ranges so long as they are not over lapping.
- They do not go beyond what is set as a limit for the company.
- They cover the entire range of values up to the maximum limit allowed to the company.
- Intervals must be exclusive and exhaustive.
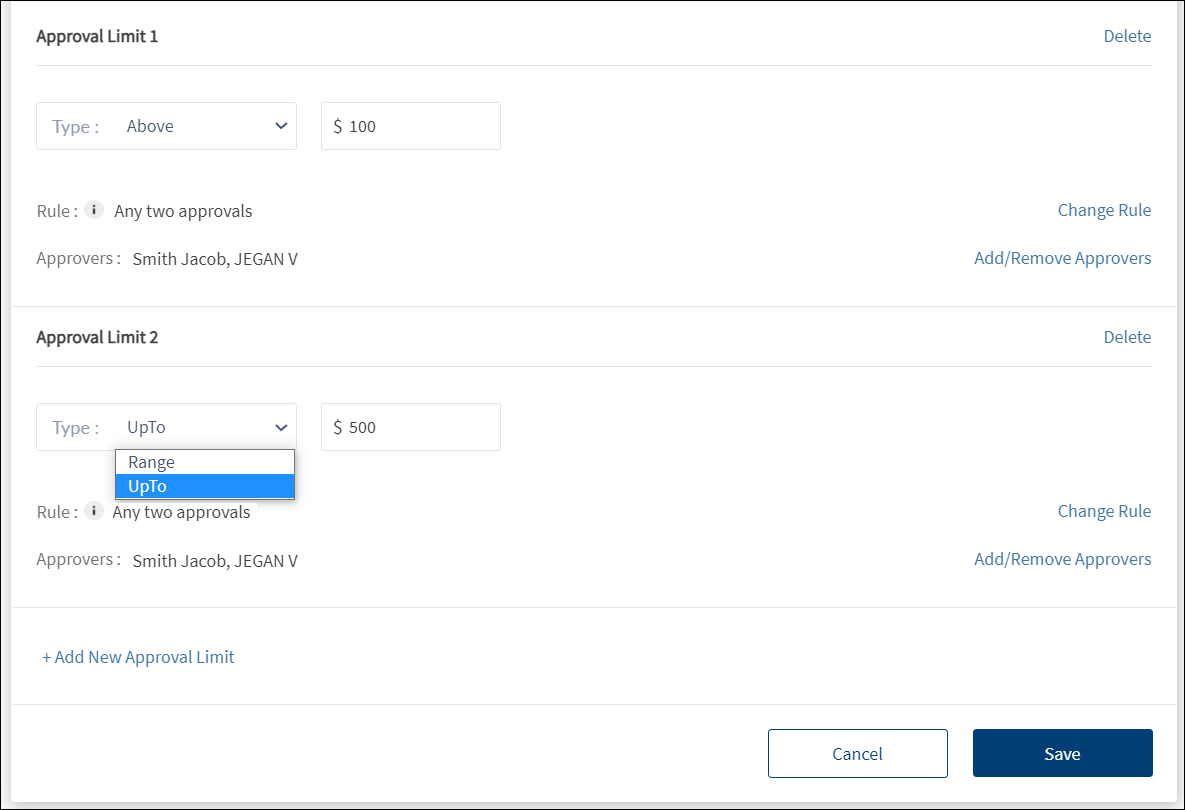
- Specify the range of values for which the rule is applicable. A range is specified as a type. Select the Type from the list. It is mandatory. The options are: Range, Upto, and Above.
- Range: Enter the From and To amount range for approval (above <from_value> up to <to_value>). The From value must be less than the To value. All From and To values have an associated currency which comes from a base currency set up and cannot be changed at run-time.
NOTE: Every company/contract has a limit set for every transactional feature (at per transaction, daily, and weekly level). It is necessary that the approval matrix must have rules of approval set for any value of transaction that may be created within the limit allowed to the contract.
- Upto: This implies that the range is zero. Enter the selected value (<selected value> is <= to_value).
- Above: This implies that the range is selected value to all values above the <selected value>.
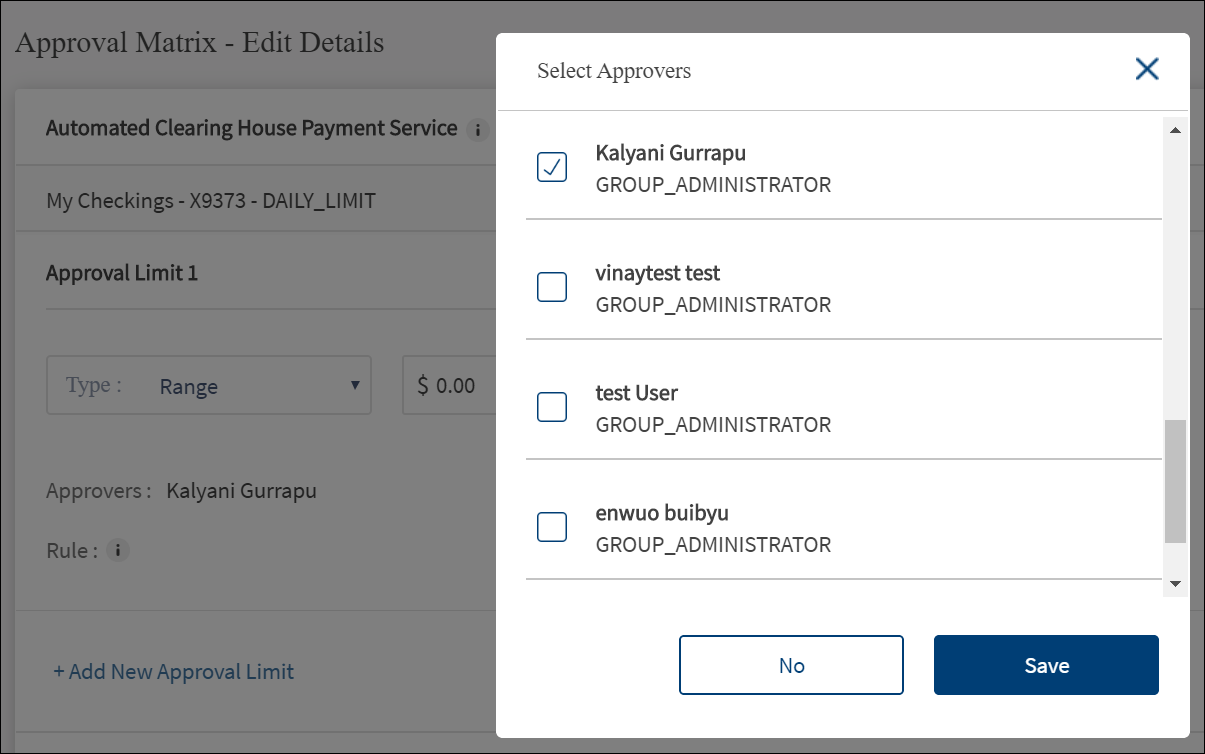
- Click Add/Remove Approvers to add or remove approvers. The Select Approvers list is displayed.

- Select the authorized approver(s) from the list. These are the signatory groups from amongst the groups associated with the customer ID for which the policy is being created. The application displays only those groups that have access permissions for the transaction type on the selected feature. It is mandatory to select at least one approver or group and depends on the approval rule. If the approval rule says, "Any two approvers are required", then it is mandatory to set at least two approvers. The minimum number of names required to be added depends on the approval rule selected.
- Click Save. The selected name(s) is added as an approver for the transaction.
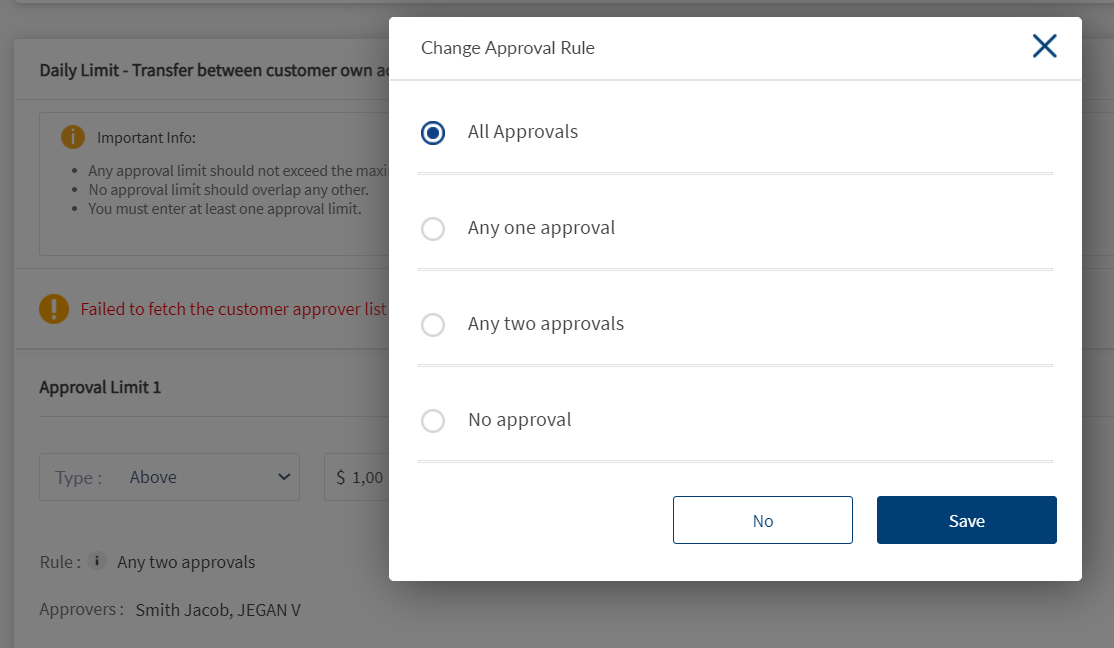
- Click Change Rule to specify the number of approvals required for a transaction that falls within the range of transaction values. The Change Approval Rule screen is displayed.

- Select the approval rule from the list. The options are shown as per the number of available approvers. For a feature, if there is only one approver in the company, then only All Approvals and Any One Approval options are shown. If there are more approvers, more options are shown.
- Click Save. The selected rule is added.
- Click Add New Approval Limit to add a new approval limit or skip this step.

- It is possible to have as many ranges so long as they are not over lapping.
- They do not go beyond what is set as a limit for the company.
- They cover the entire range of values up to the maximum limit allowed to the company.
- Intervals must be exclusive and exhaustive.
- Examples:
- Up to 10,000 - Needs approval from any one of: Bob, Mike, Gary
- 500 - 10,000 - Needs approval from any one of: Bob, Mike, Gary
- 10,000 - 25,000 - Needs approval from any three of: Bob, Mike, Gary, John
- Above 25,000 - Needs approval from John
- Multiple such approval limits can be added to the approval matrix.
- After all the details have been filled or modified, click Save.
View or Edit Account Level Approval Matrix
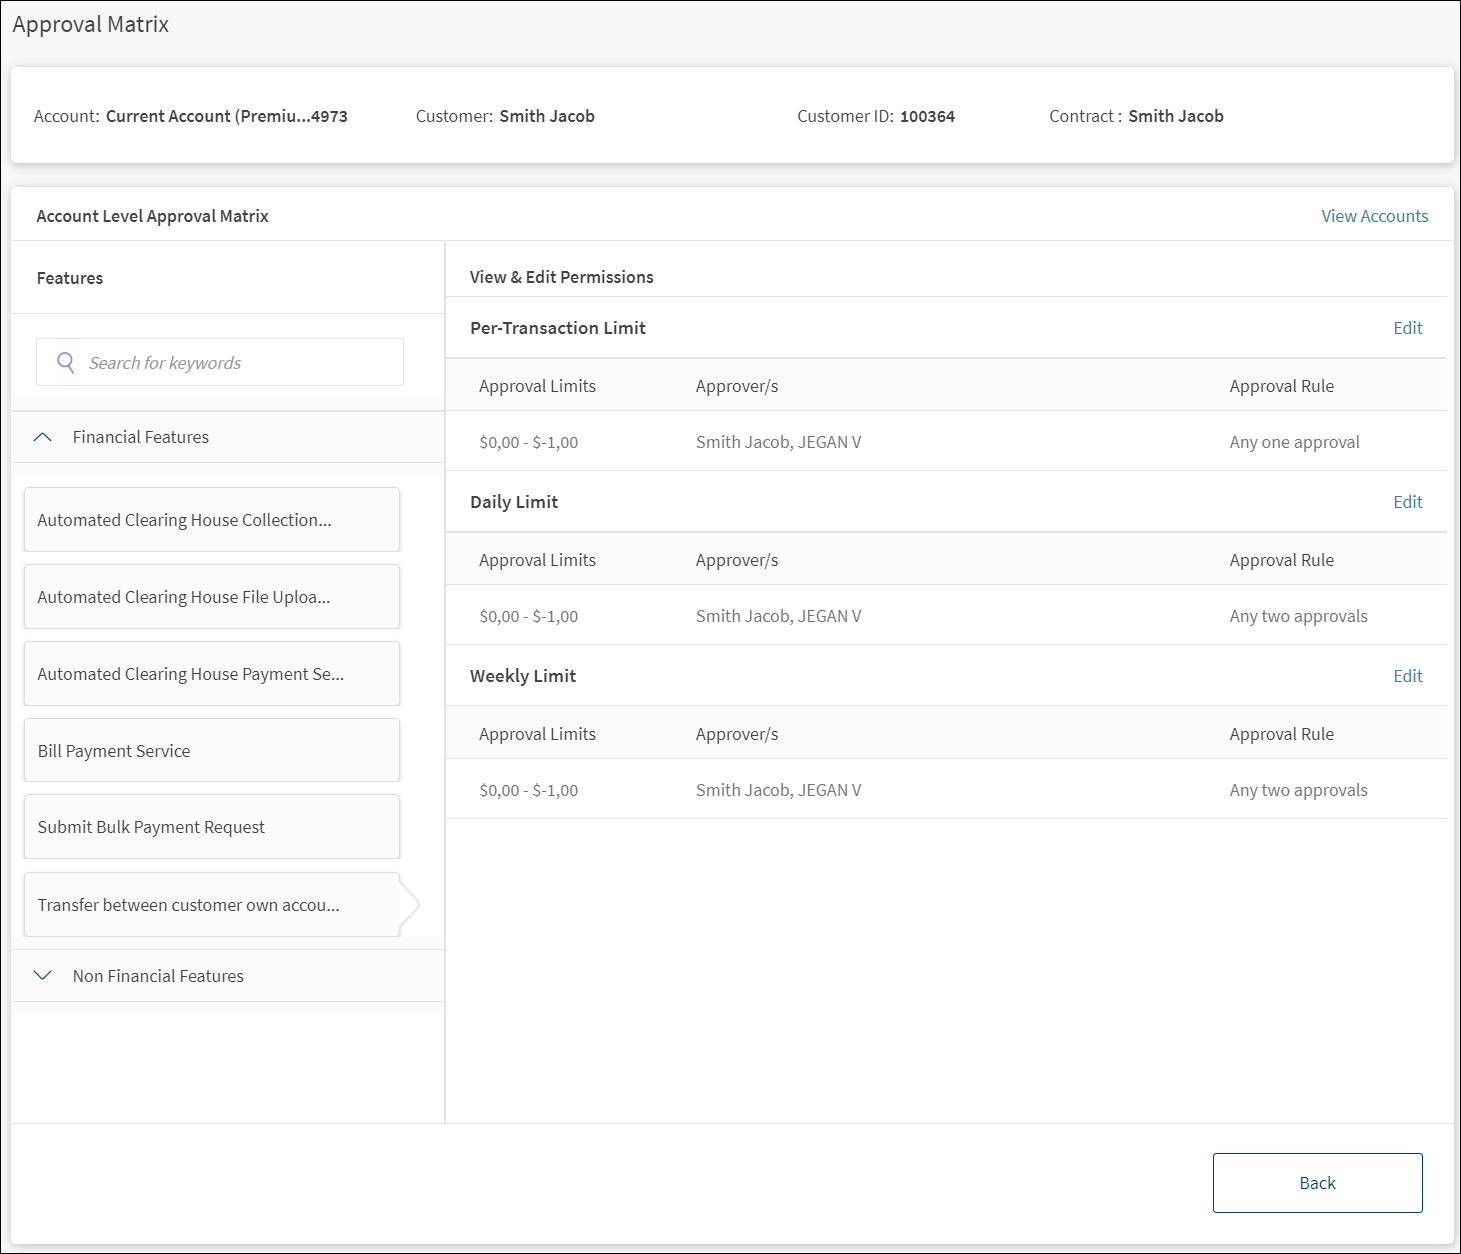
To edit the account level approval matrix for a selected feature, follow these steps:
- Select the feature (monetary and non-monetary feature actions) on the left pane. See Feature and action names for the complete list of features and actions.
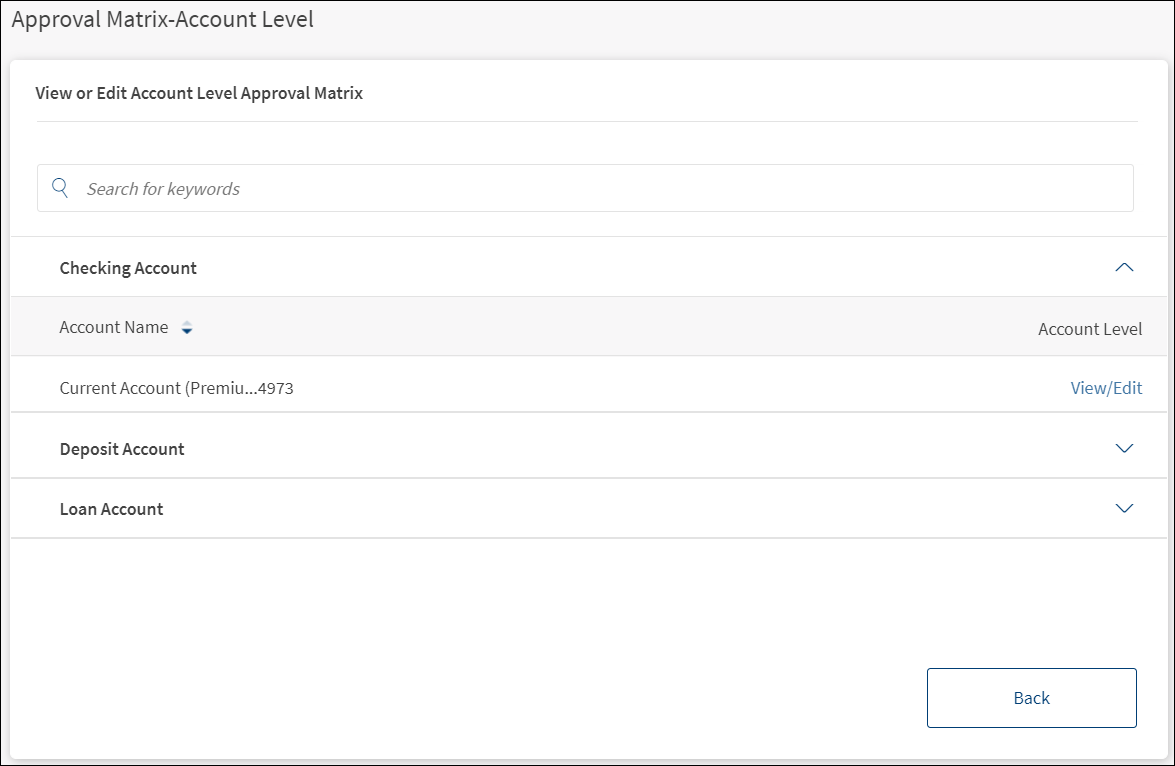
- On the right pane, click View Account Level Matrix. The Approval Matrix- Account Level screen is displayed.

- The application displays the list of applicable accounts for the selected feature.
- Click the down arrow of the required account and click the View/Edit link to modify the details of approval level approval matrix.

- The application displays the following:
- Header: The Account name, Customer name, Customer ID, and the Contract name on top of the form.
- Account Level Approval Matrix details
- Features list: Financial features and non-financial features on the left pane. Click any feature to view the corresponding permissions (per transaction, daily, and weekly limits) on the right pane.
- Search: Option to search for specific features on the left pane.
- View Accounts: Click to go back to the list of accounts.
- Back button: Click Back to navigate back to the Approval Matrix dashboard.
- On the right pane, click the Edit link placed by the side of the permission to modify the details. The Approval Matrix - Customer Level Edit screen is displayed.
- Follow the steps as explained in the Edit Customer Level Approval Matrix section to modify the details.
- After all the details have been filled or modified, click Save.
Configuration
- The visibility of each feature is controlled through the permissions defined for the user. See permissions for more information. The permissions at user levels are defined during user creation and while editing the user details after the user is created.
- In case the user does not have access to any of the features, that option will not be visible on the form and on the menus.
- The permissions at the company level and role level are defined in the Spotlight application.
- Turn Approval Matrix on and off at Customer ID level. An authorized user who has access to edit the Approval Matrix for a certain Customer ID can turn off the approvals entirely for a customer from the online banking application. By default, the Approval Matrix will be on ("disable": "false").
POST: {{URL}}/services/data/v1/ApprovalMatrixObjects/operations/ApprovalMatrix/updateApprovalMatrixStatus Request Payload: { "contractId": "8216243790", "coreCustomerId": "100315", "disable": "false" } - Approval Matrix per customer with groups or without groups. An authorized user with the access to edit the Approval Matrix for a certain Customer ID can specify whether the approval rules for the customer ID to be based on Users or Signatory Groups. By default, the approval rules for the specific Customer ID will be based on Users ("isGroupLevel": "false").
POST: Post: {{URL}}/services/data/v1/SignatoryObject/operations/ApprovalMode/updateApprovalMode Request Payload: { "contractId": "8216243790", "coreCustomerId": "100315", "isGroupLevel": "false" } - Straight-through processing
- Introduced a new field "isSelfApprovalEnabled" in the application table to indicate whether the self-signature to be considered for the transactions initiated by self.
- if "isSelfApprovalEnabled" is true, then the system considers self-signature (if initiator is one of the valid approvers) and one of the approvals is fulfilled for the initiated transaction.
- If "isSelfApprovalEnabled" is false, then the system waits for other user approvals for further processing of the initiated transaction.
- Cheque book request flow. The flow diagram shows the chequebook request process where multiple approvers are involved and scenarios covering the approval and rejection processes.


APIs
The following APIs are shipped as part of this feature. For the complete list of APIs with more information, see Experience APIs documentation.
| API | Description |
|---|---|
| GetApprovalMatrix | Retrieves all the approval matrix entries for a given accountId, actionID, and limitTypeId. |
| updateApprovalMatrixStatus | Updates the status of the Approval Matrix. |
| isApprovalMatrixDisabled | Indicates if the Approval Matrix is disabled. |
| updateApprovalMatrix | Updates the approval matrix entries that match the accountId, actionId, and limitTypeId parameters that are provided as a request by the user. |
| GetApprovalRulesOperation | Retrieves all the approval rules that are set in the application. |
In this topic
